
Understanding The Production Rewrites (“Revisions”) Process As A Screenwriter
Understanding Revisions As A Screenwriter
In this article I want to show you how the production rewrite cycle for screenplays works.
The thing is that when you open up the “Revision” function of your screenwriting software, at first, it can be a little overwhelming all the settings that you have to take care of with all the colors, asterisks, and so on and so forth.
So, what I want to do is go through what the process of production rewrites is so that you have a good understanding of the workflow itself.
I’m showing you this in Final Draft, but it’s not about how to do that in a software, it’s just about explaining the principle.
Because when you understand the principle, then, all of a sudden, all those settings in your software, whatever screenwriting software you use, will begin to make sense.
So, let’s go through each of the steps a screenplay goes through from writing until end of production.
One more thing, if you are someone who is or has been working in production for quite some time, you might say, ‘but there is a lot of information missing, the production process is much more complicated than this.’
Yes, of course. I’m not going through every detail of the whole production process.
But, I will go through the important steps for writers so that if you are just curious about how this works, or if you have to go through it for the first time, you get a good understanding of what the main steps are and as you work with the production company you will fill in the little gaps on the way.
Okay, let’s get started.
Let’s say, you have written a script and it was so great, it got picked up by a producer and they will produce it.
The state that your script is in at that moment is usually just what you get when you hit “export” in your software.
You have a standard title page, and the rest of the pages have normal page numbers. Usually at this point you don’t even have scene numbers.
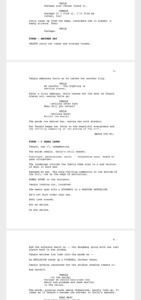 Sometimes I like to turn scene numbers on when I write just to see how many scenes I have but if I hand the script out I turn scene numbers off again.
Getting your Script ready for Production
So, next step is, you need to get that script ready for production.
For this, we need to insert scene numbers, so that the whole production teams and every department can refer to each scene with a number.
That way they can avoid miscommunication. Because they just talk about scenes in numbers, so everybody knows which scene they’re talking about.
Also, this is the point where we lock our pages.
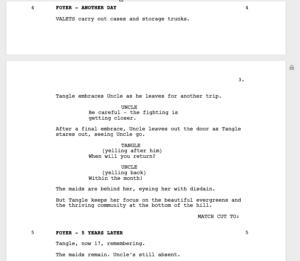 Now, what does that mean and why is that necessary?
It will be perfectly clear to you once we’ve gone through the steps that follow, but just as a quick explanation:
Every member of every department that needs to refer to page numbers, e.g. for planning the shoot and what not, they need to make sure that if they say, e.g. “Page number 3”, that everybody is taking about the same page 3.
Imagine you as the writer making changes on page 3 or before page 3 and so the content of page 3 would change, so different people in different departments wouldn’t know if they the correct page 3 or not.
This would create a whole mess in all the departments, and we will look at how this mess can be avoided.
But for now, let’s just say, before the production process begins, or when the pre-production process begins, your screenplay pages need to be locked.
Changing a Script Page
Alright, now let’s talk about changes.
Script changes in the production cycle are called, you guessed it, “revisions”.
Let’s suppose that on said page 3 we need to make a change. And it’s only going to be a small change. The page break between page 3 and page 4 is not going to change, but there is one line on page 3 that is different.
So, now we need a system to indicate two things:
First, we need to indicate to the whole production department, which is the line that is different, because maybe production-wise that can be a major change. Imagine a character was using a bicycle before in the original version of page 3, but now, he or she arrives in a car. Major difference. Not for the writer, the writer can just put a different line in the script, but the production department needs to organize that car on the day of the shoot. They need to take care of it.
So, they need to see very quickly what the difference is between the original page 3 and the revised page 3.
Also, everyone who uses that page 3 to do the work for their department needs to know that they are referring to the same version of page 3 as others.
And there are solutions for both of these problems.
That’s where revision colors and asterisks come into play.
If a page is revised, as in this case the revised page 3, that page gets a new color. And there is a standard order of the colors you go through, which is not important at the moment, just know there is one, and your production department will tell you what the order is.
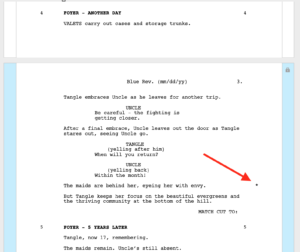 So, what we’re going to do is we’re going to print, or hand out digitally, this page 3 with a page color that is not white. Because the original version was white, and the next revision usually gets the color blue.
So we have a full script in white, just the page 3, where we made the change is now blue, because it has been revised the first time.
And on that blue page 3, the line that has been changed is marked up, so that when someone receives that new blue page, that person doesn’t have to look for the changes, because that takes up a lot of time innecessarily. So, the line is marked up.
And this is usually done with an asterisk symbol at the right margin of the line or lines that have been revised.
So, this is what page 3 now looks like. It has blue paper – real paper or digital paper – and it has an asterisk where the revised line is.
Changing the Title Page
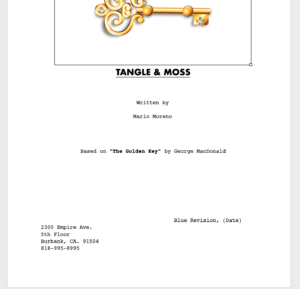
Every time you go from one revision to the next, you indicate on the title page what the latest revision is.
So in this case, since we’re now in the blue revision, we would to to the title page and we would put something like, for example, “Blue Revision” and the date. So when someone looks at the title page they instantly know what the latest revision color and date is.
 Adding Pages
Ok, so now let’s suppose that on page 4 we have another change, but this time we need to add a line.
The last time, on page 3 we just changed a line and that didn’t change the page break, but this time we add a line and this would cause the page break to change.
So, if we didn’t have locked pages, … remember we locked our page numbers before we started the production process… if we didn’t have locked pages, because of this little addition on page 4, all following page breaks might also change, so you would have to redistribute the whole script and everyone would have to change there references to page numbers because the content of each page would have changed.
In this case it might only change a little bit, but still, imagine if that happens a couple of times, and the page numbers keep changing… you’d never know which page is which.
So, we have locked pages. The page numbers that are already established stay and cannot be changed.
So, what are we going to do to deal with the page break caused by the addition on page 4?
Very simple solution: we add a page in between page 4 and page 5. This way all the other page numbers stay the same and we can avoid a production mess.
Also, like with the last change, page 4 will now get the blue color, because it is the first revision of page 4 and after page 4 we add a page that gets the page number “4A”. And that additional page “4A” only holds what breaks over from page 4. So, there might be only one single line, depending on how much we added on page 4. And the rest of the page stays blank.
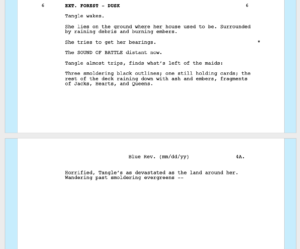 So, we have revised page 4, then page 4A with only the rest of the content from page 4, and then after page “4A” we continue with page 5, which is white, because it hasn’t gone through a revision yet.
Multiple Revisions
Now let’s suppose that we need to change something on a page that has already been revised, for example on page 4 again.
What’s going to happen?
If we have another change on page 4, the blue version is not relevant anymore, and we need to indicate that there is an update.
So, we do the same thing again, we put an asterisk next to the changed line and the page color changes to the next one in line. After blue this is usually Pink.
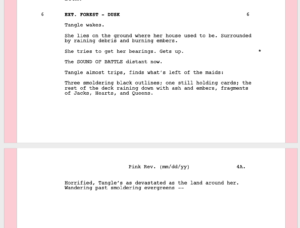 And so on and so forth, that means, every time there is a change the change is indicated on the side of the line, and the page color changes to the next one.
Full revised Draft
Over time, with many changes on different pages with different revision colors, your script will look like a rainbow, and there might not be a lot white pages left.
And, on some pages you might have reached the last color in the color palette, so, what do you do then?
What is done usually is, you say, “ok, let’s do one full draft revision to reset every page” so to speak. So, you jump to the next revision level, but this time the base color is going to be blue.
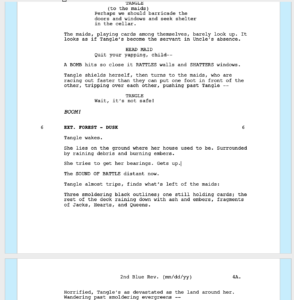 The last time when we started out, the whole script was white. This time, because we’ve gone through the whole cycle one time, the whole script will be redistributed, but this time as a blue script. So it’s very obvious to everyone that this is not the original script. Because if you did this full draft in white, it could be confused with the original script.
So, it’s done in blue.
And then, when single pages keep changing, you just add in that one page in the next color, starting with the color that comes after blue, which is pink in most cases.
And so on and so forth.
Locking “A” Pages
“A” pages that have been added to handle a page break can also be locked. Because once they’re “official” so to speak, you want to make sure there aren’t different versions going around for this page.
The process is the same as for “normal” pages. You just lock the “A” pages and they will stay in place. When you then need to add a page in between, let’s say, page 3 and page 3A, that additional page will be called “2AA”.
Showing and Hiding Revisions
So, that’s basically what the production rewrites process is about.
Let me just add one more thing, you might find settings in your software that give you control over what revisions you want to see.
So, for example, you can define if you want to see only the revision marks – which are usually asterisks – from the last revision or from earlier revisions, and so on and so forth.
But these are software specific settings, I just wanted to make you aware of the fact that those can be setup differently, depending on how the production company wants to handle them.
Alright, I hope this gave you a good understanding of what the production rewrite process is about, so now when you go to your screenwriting software it will be much easier for you to set it all up.
Also, check out the articles that explain how these revisions work in the software that you are using.