How To Create Storyboard Shots In Celtx
Celtx Storyboard
With the free version of celtx, you can also make use of the storyboard function, which is very nice.
The storyboard function helps you “block shots” as they say, which means, thinking about and deciding, how would those scenes that you’ve written look like if you were to divide them up into different shots.
If you’re a writer who works with a production company, most likely a director or a storyboard artist is going to do that work for you. Because you’ll most likely be busy writing.
But, maybe you are planning to do your own production, your own short, or whatever it might be, so, let’s look at what the storyboard function offers you in terms of creating your own visual guide for shooting what you’ve written.
In my opinion, the storyboard function in celtx is not too extensive, but keep in mind that this is what is offered for free, you pay nothing for it. And when you just need a little help in staging some not too complicated scenes – production wise speaking – it may be of great help.
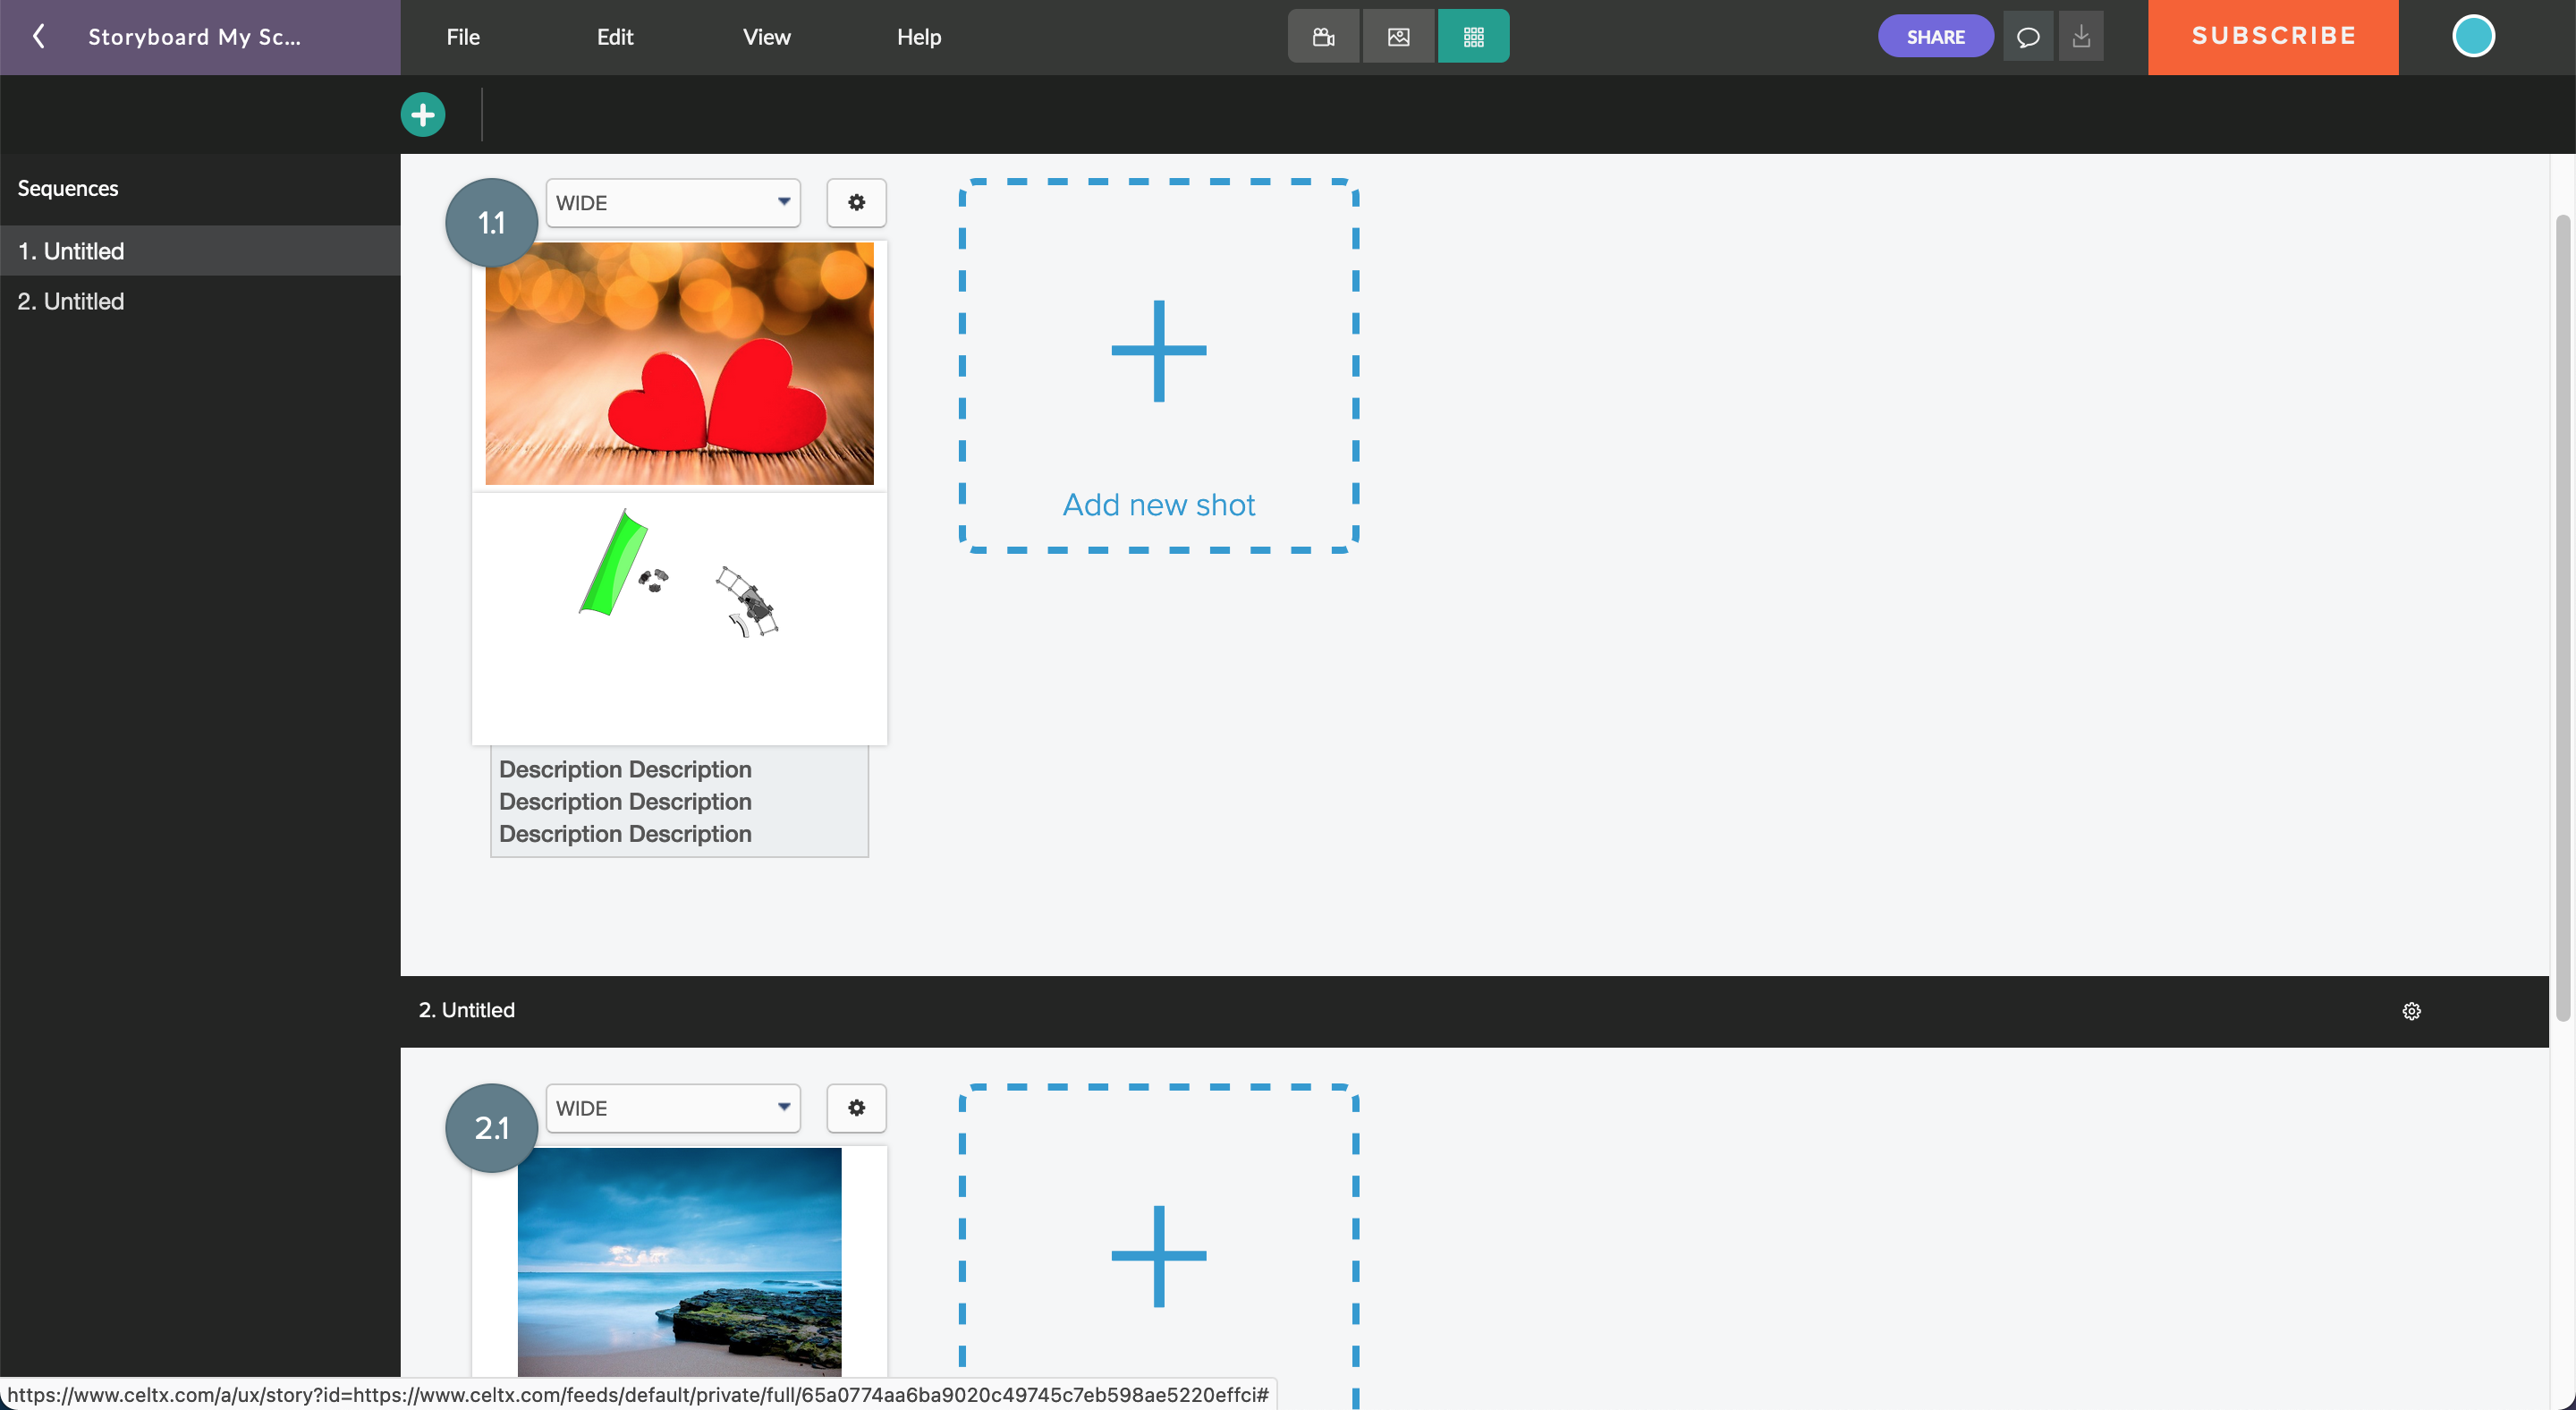
To get to the storyboard function, click on the project name, so that celtx brings you to the overview of the different functions within that project, where “Screenplay” is one of them and would give you access to the screenplay editor.
This is the one you’ll probably use most.
But this time we won’t go into the screenplay editor, but rather, to the storyboard function.
Click on “Storyboard”, and celtx opens up a new tab. And what you see here is an empty canvas so to speak, with a big plus that says “add a shot”.
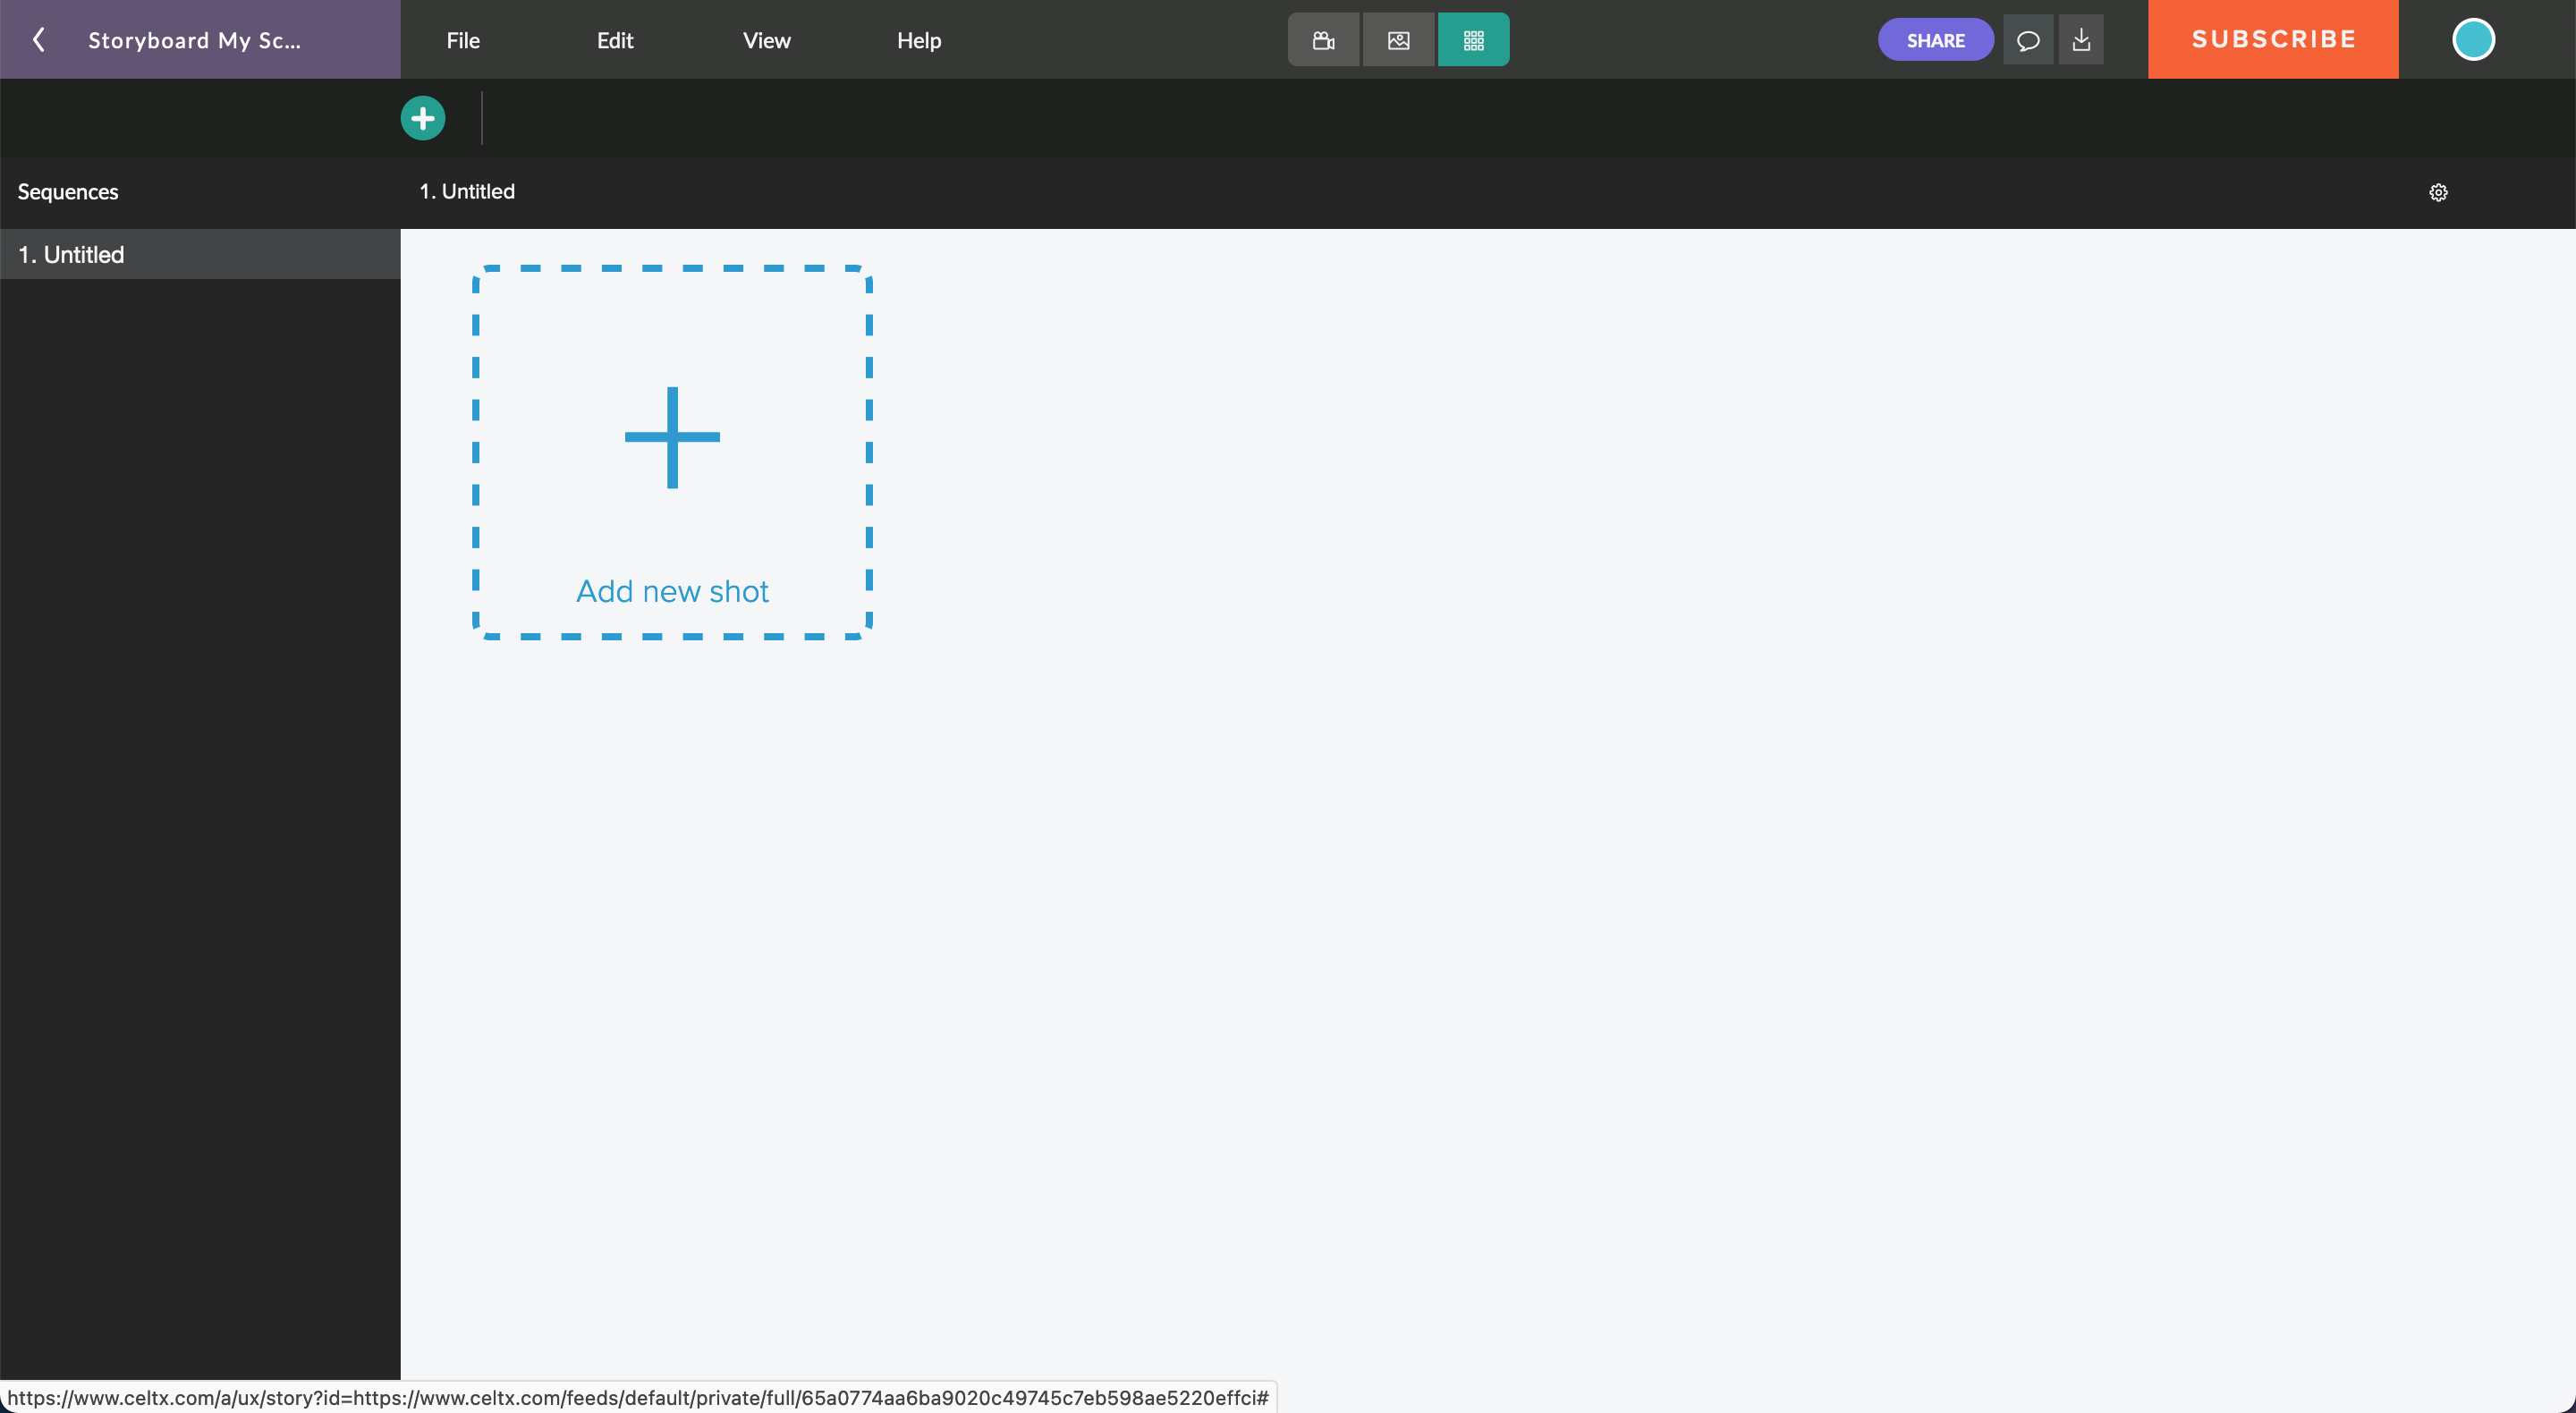 And that’s what we’re going to do.
Adding Shots
If you click that “plus”, celtx adds a new shot here, and it gets assigned the number 1.1, because it’s the first shot in this sequence.
Shots are ordered in sequences.
The first number represents the sequence number, and the second number represents the shot number within that sequence.
We’ll look at adding sequences later on.
First, let’s see what we can do with this shot.
At the top of the shot you have a drop-down where you can select the type of shot, as in wide shot, close up, etc.
At the top right, if you click the “cog” icon, you can select between removing the shot, or duplicating it, in case you have a shot that has elements that you want to reuse in the next one.
And then, below, we have three areas: an image area, a shot blocker area, and a description area.
In the image area, as you might assume, you can add an image, the same way you usually do in celtx, you click “add an image”, and you are taken to the “add image” dialog where you can choose between uploading an image, selecting one from your library, or searching for one online, which you can then add to the library and use here in the storyboard.
The description below is also relatively self-explaining, you put in what you deem necessary as additional description text in addition to what we’re going to add as storyboard shot.
And then, the shot blocker:
Shot Blocker
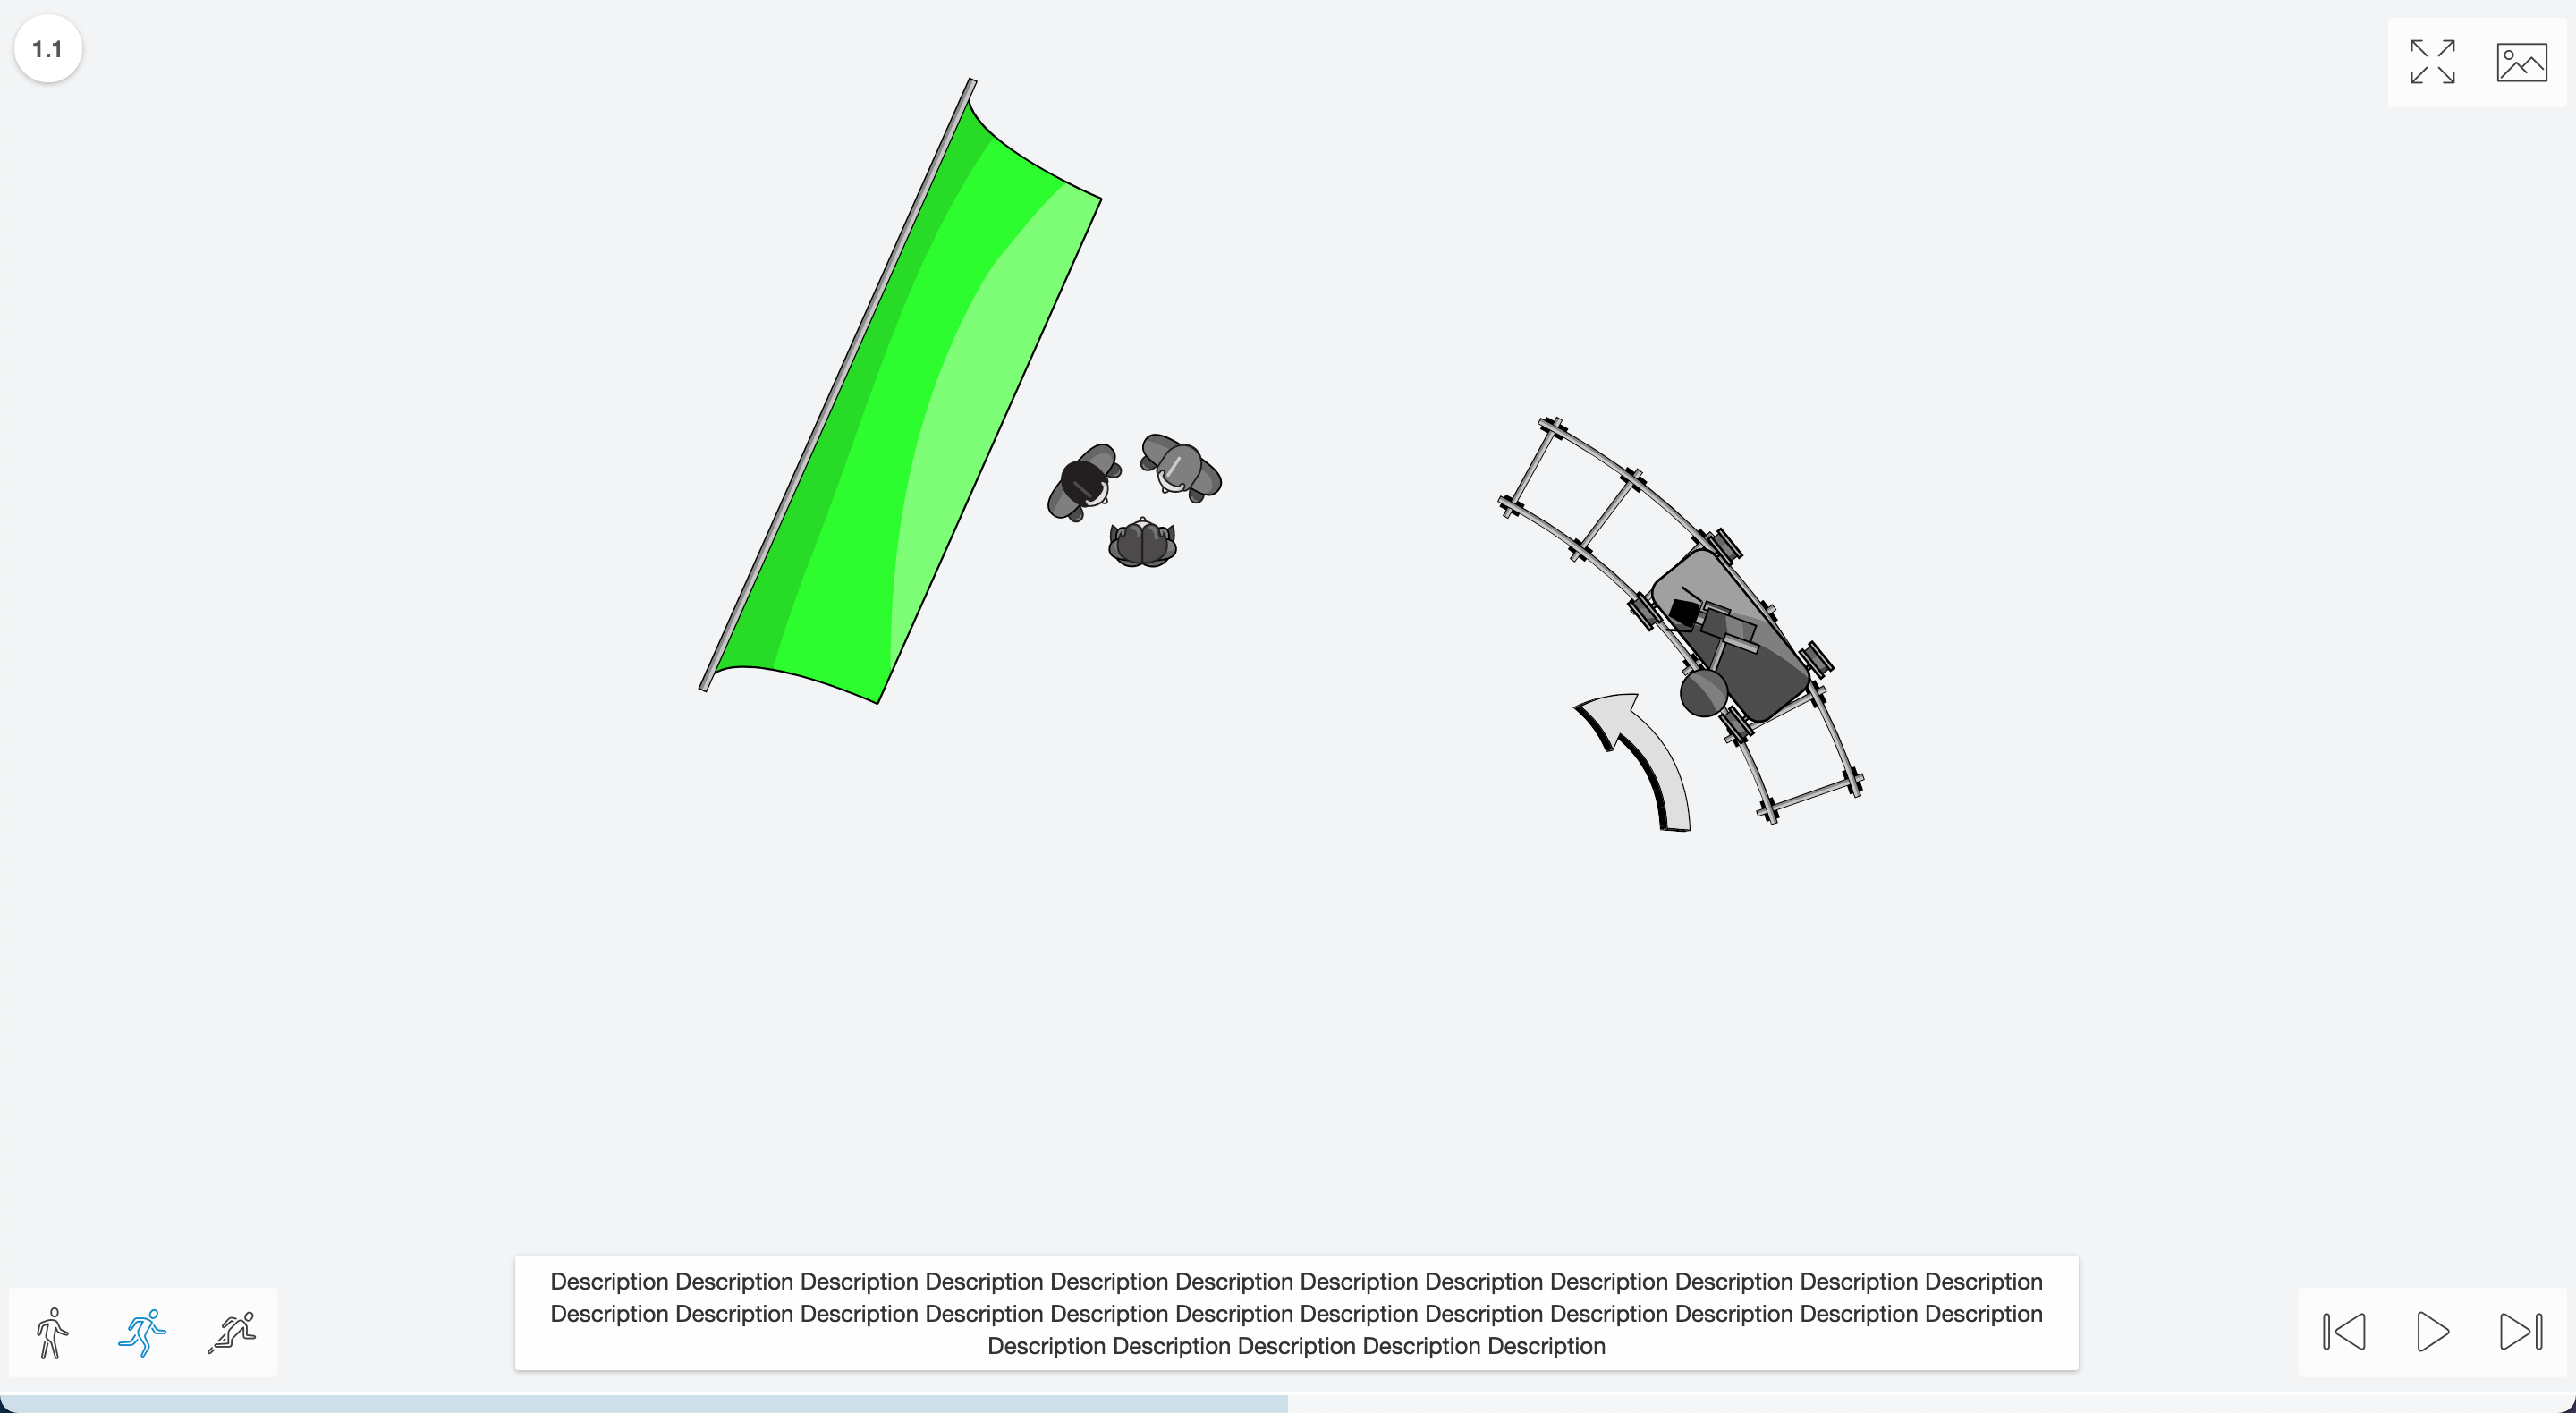
If you click “Edit Shot Blocker”, celtx opens up a new tab, and here is where the real storyboarding takes place if you will.
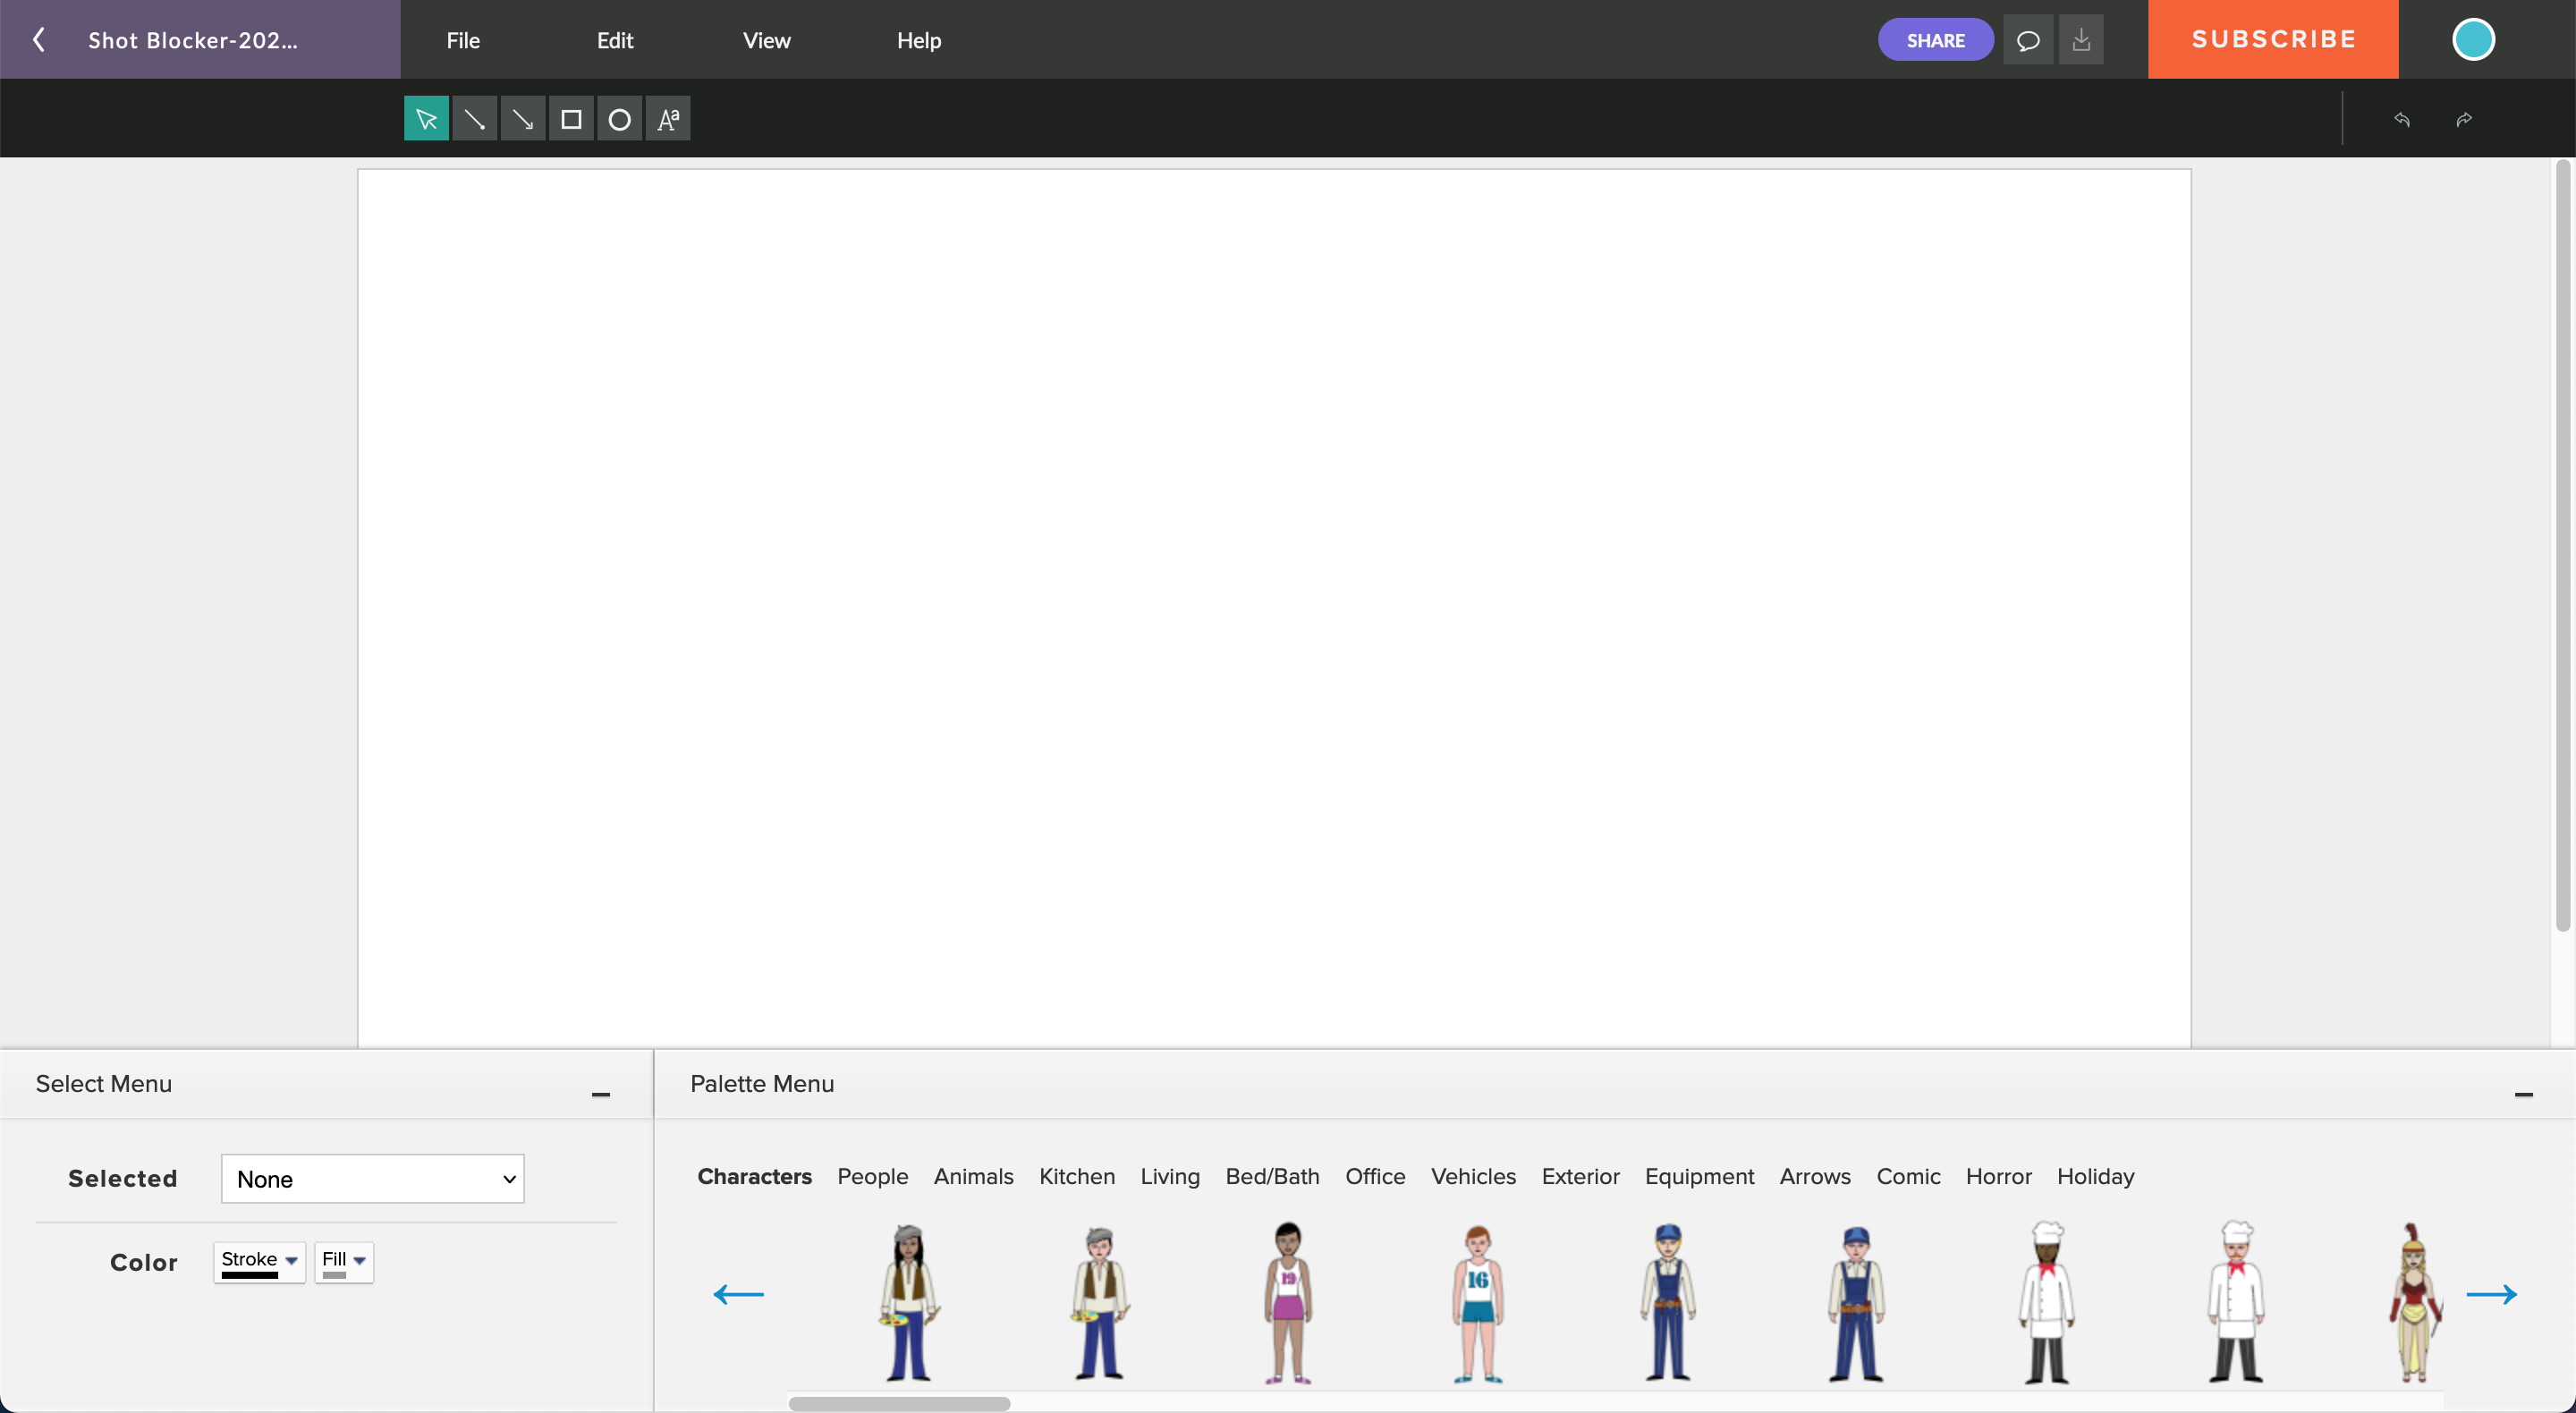 What we have here is a canvas area where we can do our storyboarding. And for that, celtx gives us ready-made objects that we can use.
And by “objects” I mean all kinds of things.
If you take a look at the so-called “Palette Menu” below, where you see a bunch of people waiting to appear in your scene, if you click the right arrow you see more of these people that you can choose from, and directly above, you see that “Characters” is boldened, because that’s were we are right now. We are in the “Characters” selection.
But there are others to choose from.
If you click through these other sections, people, animals, kitchen, and so on and so forth, you see different people and objects that you can choose from to put in your scene. You also have equipment like cameras, dollies, and more.
So, what you do is, you just grab whatever elements you would like to use in your scene and you drag them to the canvas above. Or, you just click them, and they will appear in the canvas.
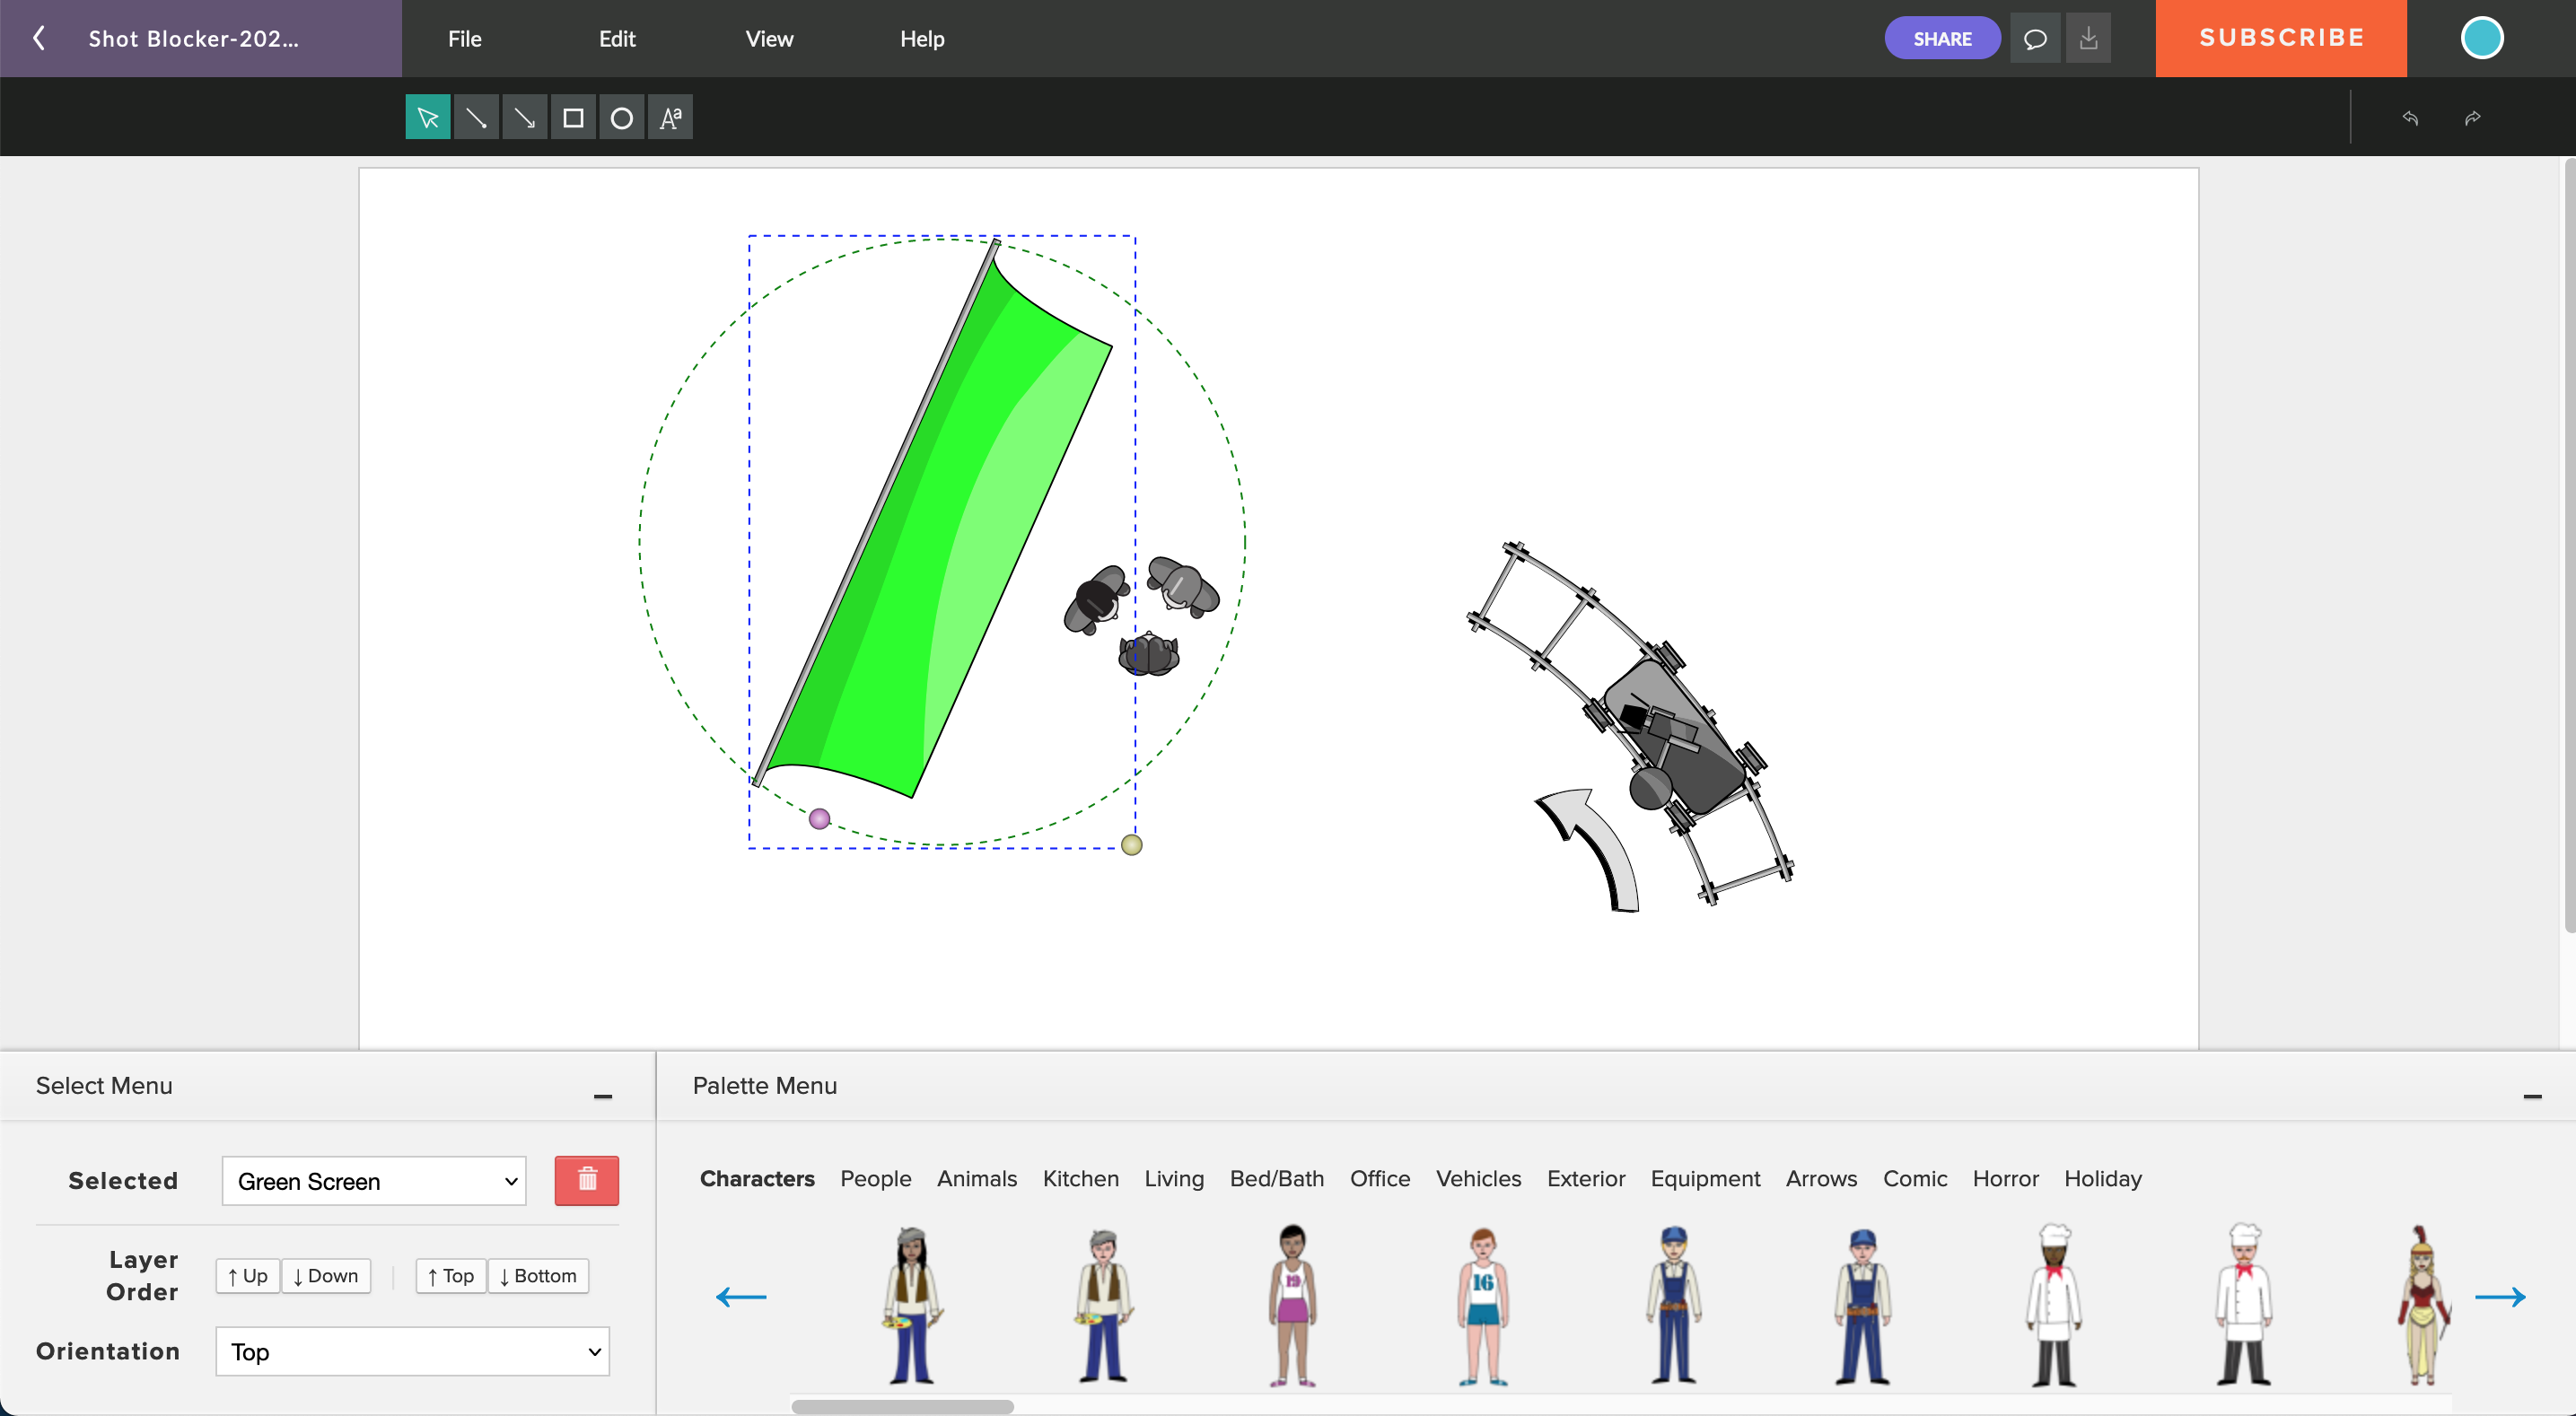
If you select them on the canvas, you see that celtx gives you controls to manipulate that object that you added, because of course you will want to resize it and maybe also rotate it. So what you do is, you use these little circles, or handles, to adjust the size and the rotation.
 To change the place where they are on the canvas, you just click-drag them to another place and let go.
In the lower left part of the screen, the “Select Menu”, you see additional options for the element that you have selected on the canvas.
First of all, at the top you have all the elements on the canvas listed, and you could select another one, or, you can make sure that the right one is selected in case you have several elements overlapping each other, for example, and in the canvas itself it might not be 100% clear, which one the selection belongs to.
Then, below that, you get layer order control buttons.
When you have several objects overlapping each other, you need to be able to define, in which order they are stacked on top of each other. That’s what you can do with these buttons.
With “up” and “down” you can move an element one layer up or down, and if you need to move an element several layers up or down, you just click it several times.
If you know that you want an element to be on the lowest layer, “behind” everything else, so to speak, or, on the top most layer, which would be “in front of everything else”, you can use these “top” and “bottom” buttons which send the selected element directly to the top or bottom layer.
Then, at the bottom you have an “orientation” option. Depending on the object that you have selected on the canvas, you can select from different view points here, for example, if you want to see a person or an object from different sides or from the top.
Additional Objects
In addition to the persons and objects you can choose from the “Palette Menu” at the bottom, you have some tools to choose from in the upper left above the canvas.
The left-most button is the selection mode. If that is activated, you can use the mouse pointer to select objects on the canvas just by single-clicking on them.
The other buttons are for creating certain things. The first one is for lines, the second for arrows, the third one for squares and rectangles, and the third one for circles and ellipses.
The button most to the right lets you create text.
The way it works is you just select the tool that you wan to use, then click-drag on the canvas to create the shape that you want to create, or in the case of text you just click where you want to locate the text, and then once the object is created, you can select two colors in the lower left “Select Menu”: the color for the stroke, or the border if you will, and the color for the filling.
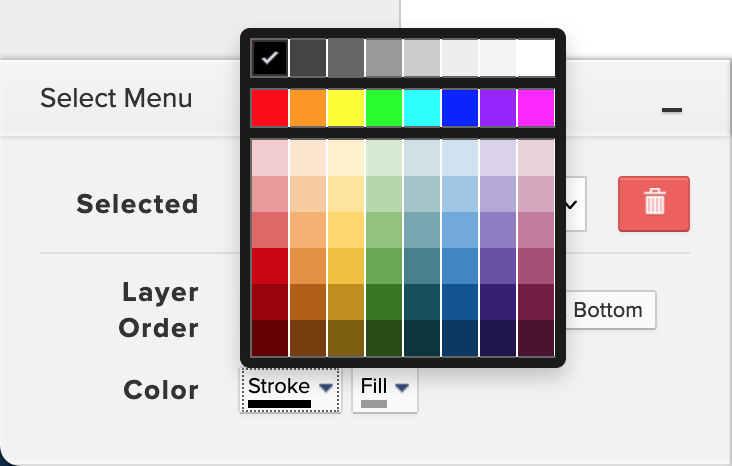 If you don’t want to see any stroke, or any filling, there isn’t really an option for that, but what you can do as a workaround is, just select the background color instead, although, this workaround doesn’t work all the time, for example if you would like to see what’s behind the frame of a rectangle or circle.
But still, I think this shot blocker gives you a couple of very useful tools that let you create a simple storyboard very quickly and easily, and for sure it’s lot better to have a quick and simple storyboard for free in a very short time than having to draw it all by hand (in case that’s not your cup of tea), or having to hire a storyboard artist for that.
Once you’re satisfied with the result in the shot blocker, you just go back to the storyboard by clicking on the left-arrow at the top left of the screen.
Now back in the storyboard you see a little preview of what you just created in the shot blocker.
Creating Sequences
One more thing, if you want to create more sequences, in order to organize your shots, you use the “plus” button in the upper left, just above the sequences list on the left.
 Now celtx creates a second sequence, and there you can add more storyboard shots. As you can see, this sequence now starts the numbering with number two.
You could for example have one sequence of shots for every scene, and within that sequence you place all the necessary shots and angles for that specific scene.
You can also switch the sequences around, just grab one of them in the sequence list on the left and drag it to where you would like it to be.
Celtx will then adapt the sequence numbering accordingly.
If you want to remove a sequence, use the “cog” icon at the right edge of the sequence title bar, and select “Remove Sequence”. Just be aware that this will also delete what is inside that sequence, and there is no “undo” function, so in case you have shots that you still want to use in other sequences, grab the shot you created with its number, and drag it into another sequence.
Print/Download Storyboard
To print or download the storyboard you crated, go to “File – Print/Download PDF”. There you can select, if you want celtx to print the shot blocker and the image or just one or the other.
You can also select just to export a certain range of sequences instead of the whole storyboard.
And then just click “Download”, and celtx will save the storyboard you created as a pdf file.
Storyboard Player
If you want to flip through your storyboard so to speak, and just take a look at the succession of images or shot blocks, you can use celtx’ built-in storyboard player.
Go to “View – Storyboard Player”, and the player will open in a new tab.
 In the upper left you see the number of the shot. In the upper right you have two buttons, the first one controls the size of the picture, and the second one toggles between showing the image or the shot block.
At the bottom left you can choose between three different speeds, and in the bottom right you have play controls to play or pause, or to jump back and forth between the different shots of your storyboard.
This gives you the possibility to see a very rough version of your story and it should give you a rough idea about if the order of your shots work.