How To Write Dual Dialogue In Movie Magic Screenwriter
Dual Dialogue In Movie Magic Screenwriter
There are times in a script when you have two characters speaking at the same time and you want to indicate that by putting the two blocks of dialogue next to each other in the script, rather than on top of each other.
It’s very easy to do that in Movie Magic Screenwriter.
First, write your dialogue, as you would write it normally, just putting one block of dialogue after the other.
 Then, put your cursor in the dialogue block that you want to appear on the left, and go to “Format – Dual Columns” and choose “Left” from the submenu.
Do the same for the block that should appear on the right side of the page, next to the other block and choose “Right”.
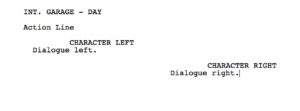
Now, in the script, the two blocks of dialogue still aren’t next to each other, but you see that their indentation settings have changed.
 We now have one that is more on the left side and one that is more on the right side.
That is only for you as an indication so that you see instantly that these chunks of dialogue will be formatted differently once you print or export the script.
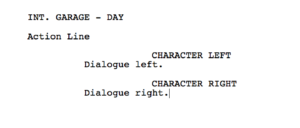
If we go to the print preview, we see that the two “left” and “right” dialogue blocks are directly next to each other on the printout, like they should be.
 So, that’s how you create dual dialogue in Movie Magic Screenwriter.
If you want to get back to the regular dialogue formatting, just put your cursor at the corresponding block of dialogue or select both of them at once, and then go to “Format – Dual Columns” again and choose “Normal”.
Movie Magic Screenwriter now gets rid of the two columns and you return to standard dialogue formatting.
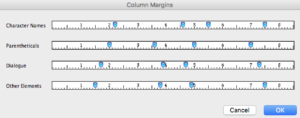
You can also change the margin settings for the two-column setting, if you go to “Format – Dual Columns – Set Column Margins”. There you see all the elements that you can use in the two-column environment and with the indicators you can set left and right margins for both columns for these elements.
