How To Setup Revision And Locked Pages Preferences In Movie Magic Screenwriter
Movie Magic Screenwriter Revision And Locked Pages Preferences
In this article we’re going to look at the revision preferences of Movie Magic Screenwriter.
In case you don’t know what revisions are, take a look at my article about how the production rewrite process works in general, and maybe also the article about how to deal with revisions in Movie Magic Screenwriter, so you have a general idea about what these settings do and what the terminology refers to.
To get to the revision settings, click on the gear icon in the toolbar and then go to the “Revisions” section. If you’re on the Mac you can also go to “Screenwriter – Preferences”.
 Revision Mark Printout Settings
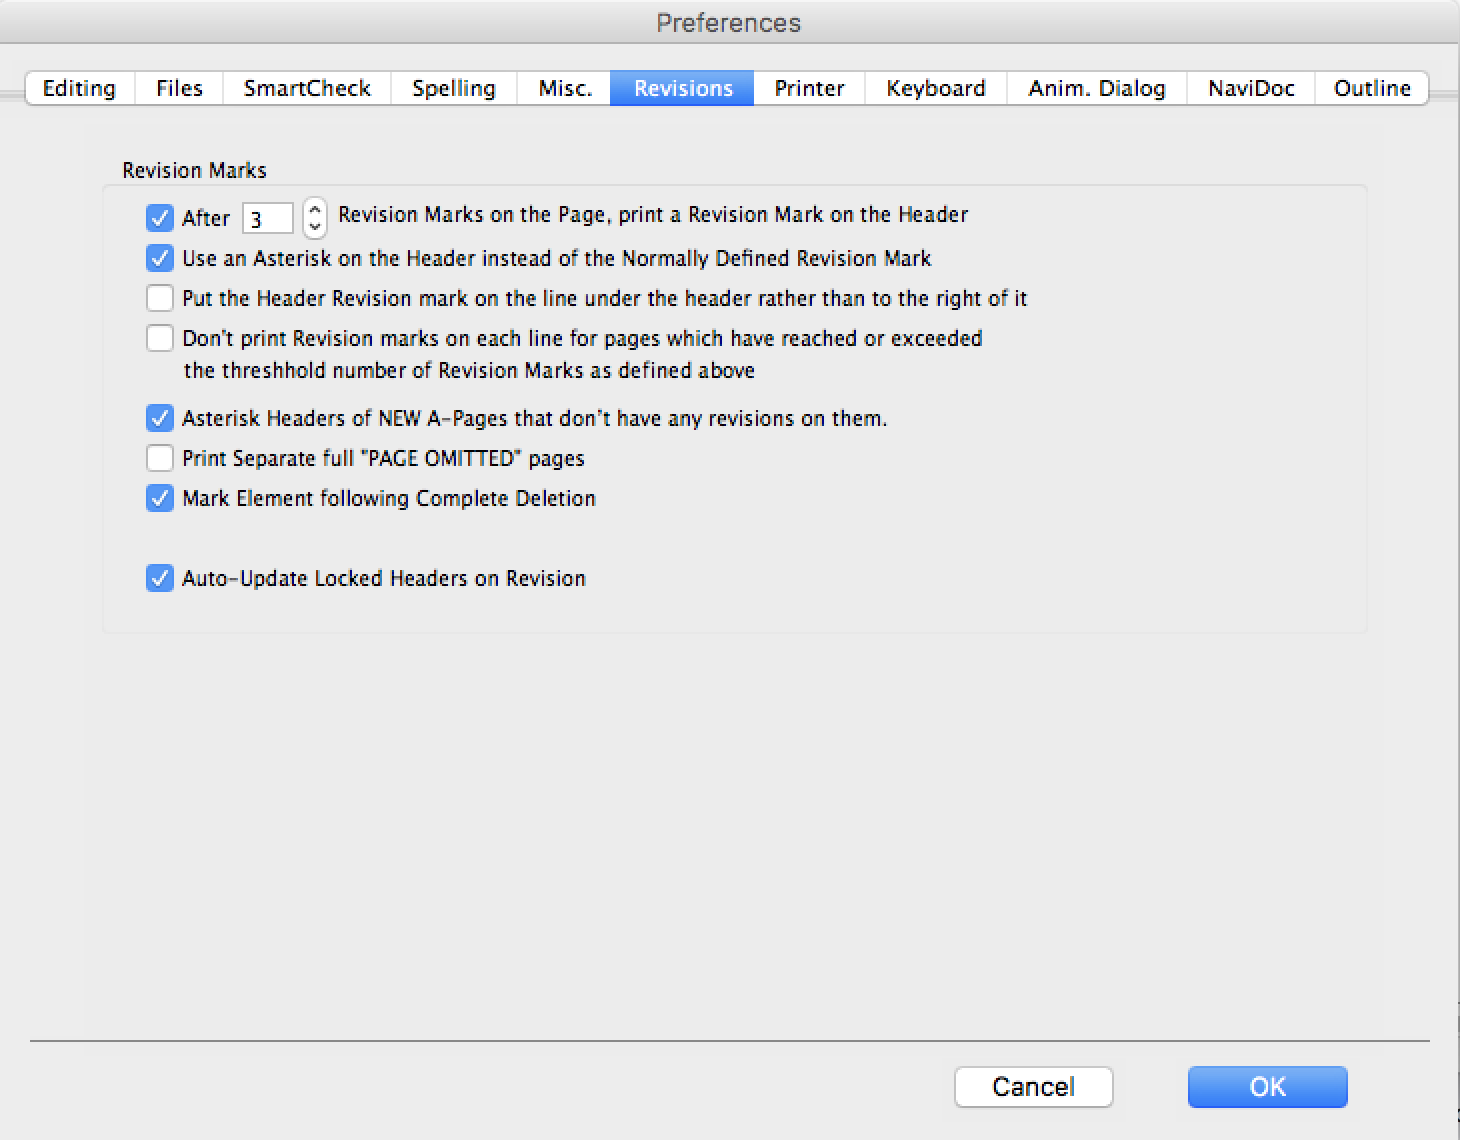
Almost all of these settings are about how revision marks are printed. So, if you change one of these settings, you might not necessarily see an instant update in your script because some of them only show on the printout.
In the first setting, you can choose, whether you want Screenwriter to print a revision mark on the header if you exceed a certain number of revision marks on the page.
This will put the revision mark next to your header information in addition to the revision marks for each line.
The next settings lets you check whether you want to use an asterisk as the header revision mark in case you have defined a different mark for the document.
Then, the third setting down lets you choose whether you want the revision mark in the header to appear one line under the header rather than on the right.
Next, you can choose whether you want the revision marks for each lines printed on documents that have more revision marks than you defined in the box up top, or not. So, if you check this, Screenwriter will not print the revision marks for each lines, just the revision mark in the header. If you leave it unchecked, it will print all the revision marks, including the one in the header if you have the first option checked.
The next setting asks you whether you want the program to print an asterisk in the header of a new A page if that page doesn’t have any revisions. That can happen if you add something to a page and the end of the page breaks over to a new A page, but the text on the new A page itself hasn’t been changed, it just flows over to the next page because of the changes on the page before.
Next, you can check, whether you want Screenwriter to print a whole page that has been omitted or not. If you delete a whole locked page from your screenplay and you go to the next revision color, you can have the omitted page printed as a blank page that just says “OMITTED”, or you can leave that page out. Note that Screenwriter will still print the page if there are new scene numbers that have been omitted. So, it will only leave the page out when the whole page is deleted and there is no scene break on that deleted page.
If you want to be sure, uncheck this setting and see if Screenwriter says “Non-printing Omitted Page” at the top. This way you can check whether this page will print or not.
Next, you can check, whether you want to mark the following element with the revision mark if you delete one element completely.
This comes into play when you delete, for example, an entire paragraph from the script. Since it’s not really a change of the text itself, and also since the paragraph is gone, there isn’t really any place where the program could put the revision mark. So you can check to have a revision mark on the following element instead so that you can see that there has been a change at this point in the script.
Then, at the bottom, you can check, whether you want Screenwriter to update information in the header automatically, such as for example the revision color and the date. If you check this, it will change this information by itself, if you uncheck it, you will have to do it manually.
Alright, those are the settings in the preferences section, but there are more having to do with locked pages.
Locked Script Settings
If you go to “Format – Element Styles” and then click on “Locked Scripts” at the bottom right you have more preferences having to do with the revision process.
 So, let’s look at them also.
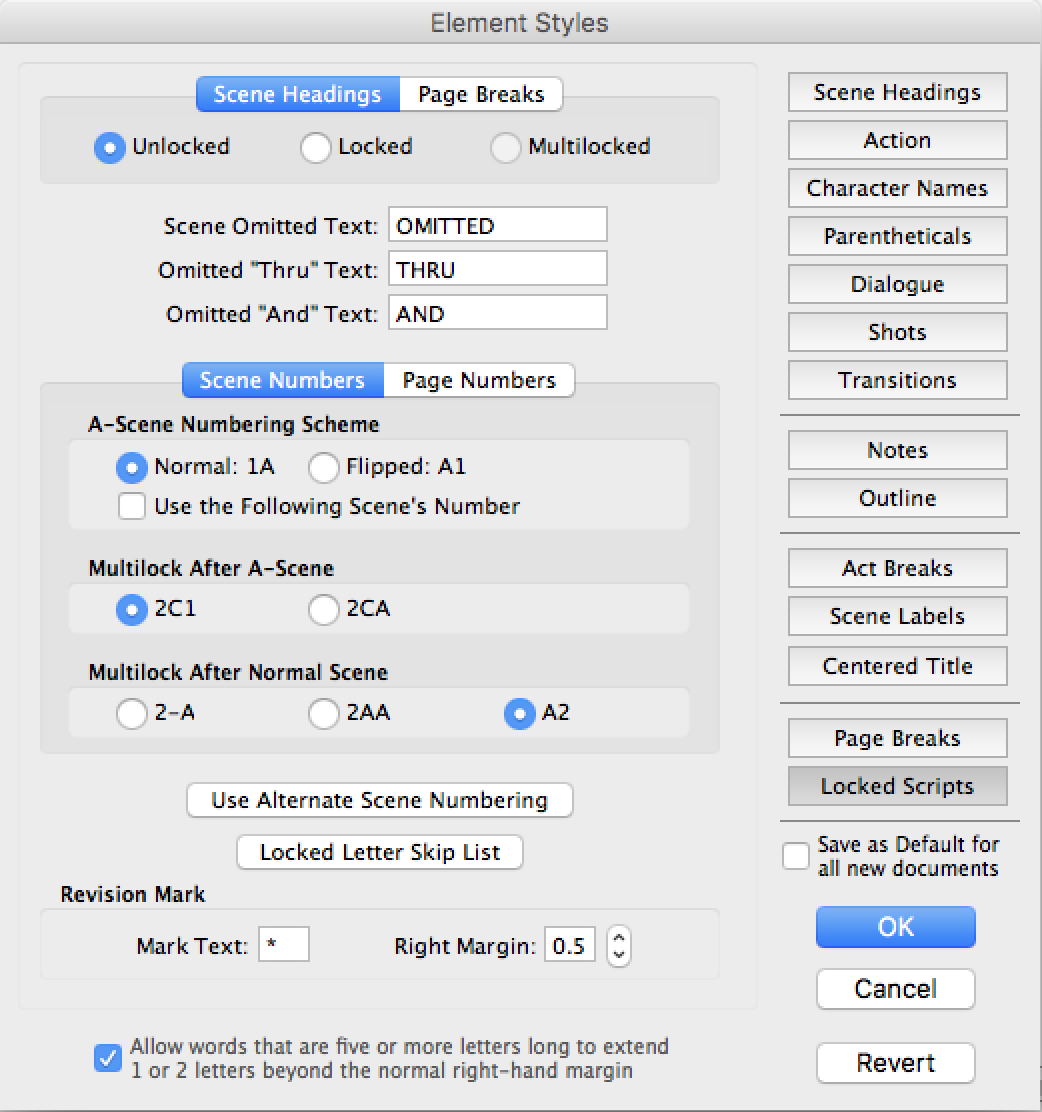
At the top, you have these three radio buttons, “Unlocked”, “Locked” and “Multilocked” for Scene Headings and Page Breaks. For some reason they added the possibility here to lock, or even multilock your script, which is funny because when you try to lock it here, they tell you that you can do it but they suggest you don’t do it here but rather with the “Lock the Script” command in the “Production” menu.
Okay, still, you could if you wanted to.
By the way, the difference between locking and multilocking is that locking refers to locking the page numbers in as they are when you begin the production rewrite process, and later, when you have a lot of A pages, B pages, and so on, and you want to commit those too so they stay unchanges, you can go into “multilock” mode so those A and B pages also stay exactly the way they are.
And here below you have a couple of settings for this locking and multilocking.
You can define your “OMITTED” text as well as your “THRU” and “AND” text. “THRU” and “AND” are used when you omit a row of scenes or pages, then Screenwriters will give you the range of ommitted elements.
Then, below, you can change the numbering scheme for scenes and pages, depending on which of these tab buttons – if you can call them that – you choose.
As for the numbering theme it’s best to talk to the production company and ask them what numbering scheme they want. Most likely they will let you know which settings to choose here. The important thing for you to know is that this is where you can set this up.
And if that isn’t enough for you in terms of setting up, click on “Use Alternate Scene Numbering” and another numbering window opens up where you have even more settings to choose for numbering.
So, here you can choose everything you want.
Standard numbering, flipped numbering – which is for example “12A” instead of “A12” – Standard with numbers – which is for example “12A1” instead of “12AA” – the same also flipped, or if that still isn’t enough for you, you can select “User Defined” and then these code fields down here activate and you can set up the numbering exactly the way you want it.
Just click in one of those fields and down below you see these buttons activate that will enter the corret code snippet if you click on them.
Also, if you hover over the text fields with your mouse you see the code snippet list and you can enter them manually.
Going back to the Element Styles window, there are a couple of settings left to check out. At the bottom you see this Revision mark section. That’s where you can replace the asterisk symbol with another symbol to indicate revised lines if you like and you can also set the margin for that revision mark on the right side of the page.
Down below you see a checkbox where you can check if you want to allow long words to extend 1 or 2 letters over the margin. This can save you a line or two and in the long run lower your page count a little bit.
Alright, we’ve gone through a ton of revision settings, the only thing left is that checkmark at the right obove the “OK” button that is the same for all the elemen style settings, where it says “Save as Default for all new documents”. If you check this, the settings you choose here will be applied to all new documents that you create from this point on.
And, of course, the “Revert” button at the bottom right resets all the settings to default.
OK, not you’re a revision settings expert and nothing can keep you from going through the production rewrites smoothly and without worries.