How To Edit And Outline Your Script With Index Cards In Movie Magic Screenwriter
Movie Magic Screenwriter Index Cards
Movie Magic Screenwriter has an index cards feature that lets you lay out your scenes like you would with real index cards on a table or a wall.
To open index cards view, go to View – Index Cards… or click the index cards icon at the bottom left below the NaviDoc.
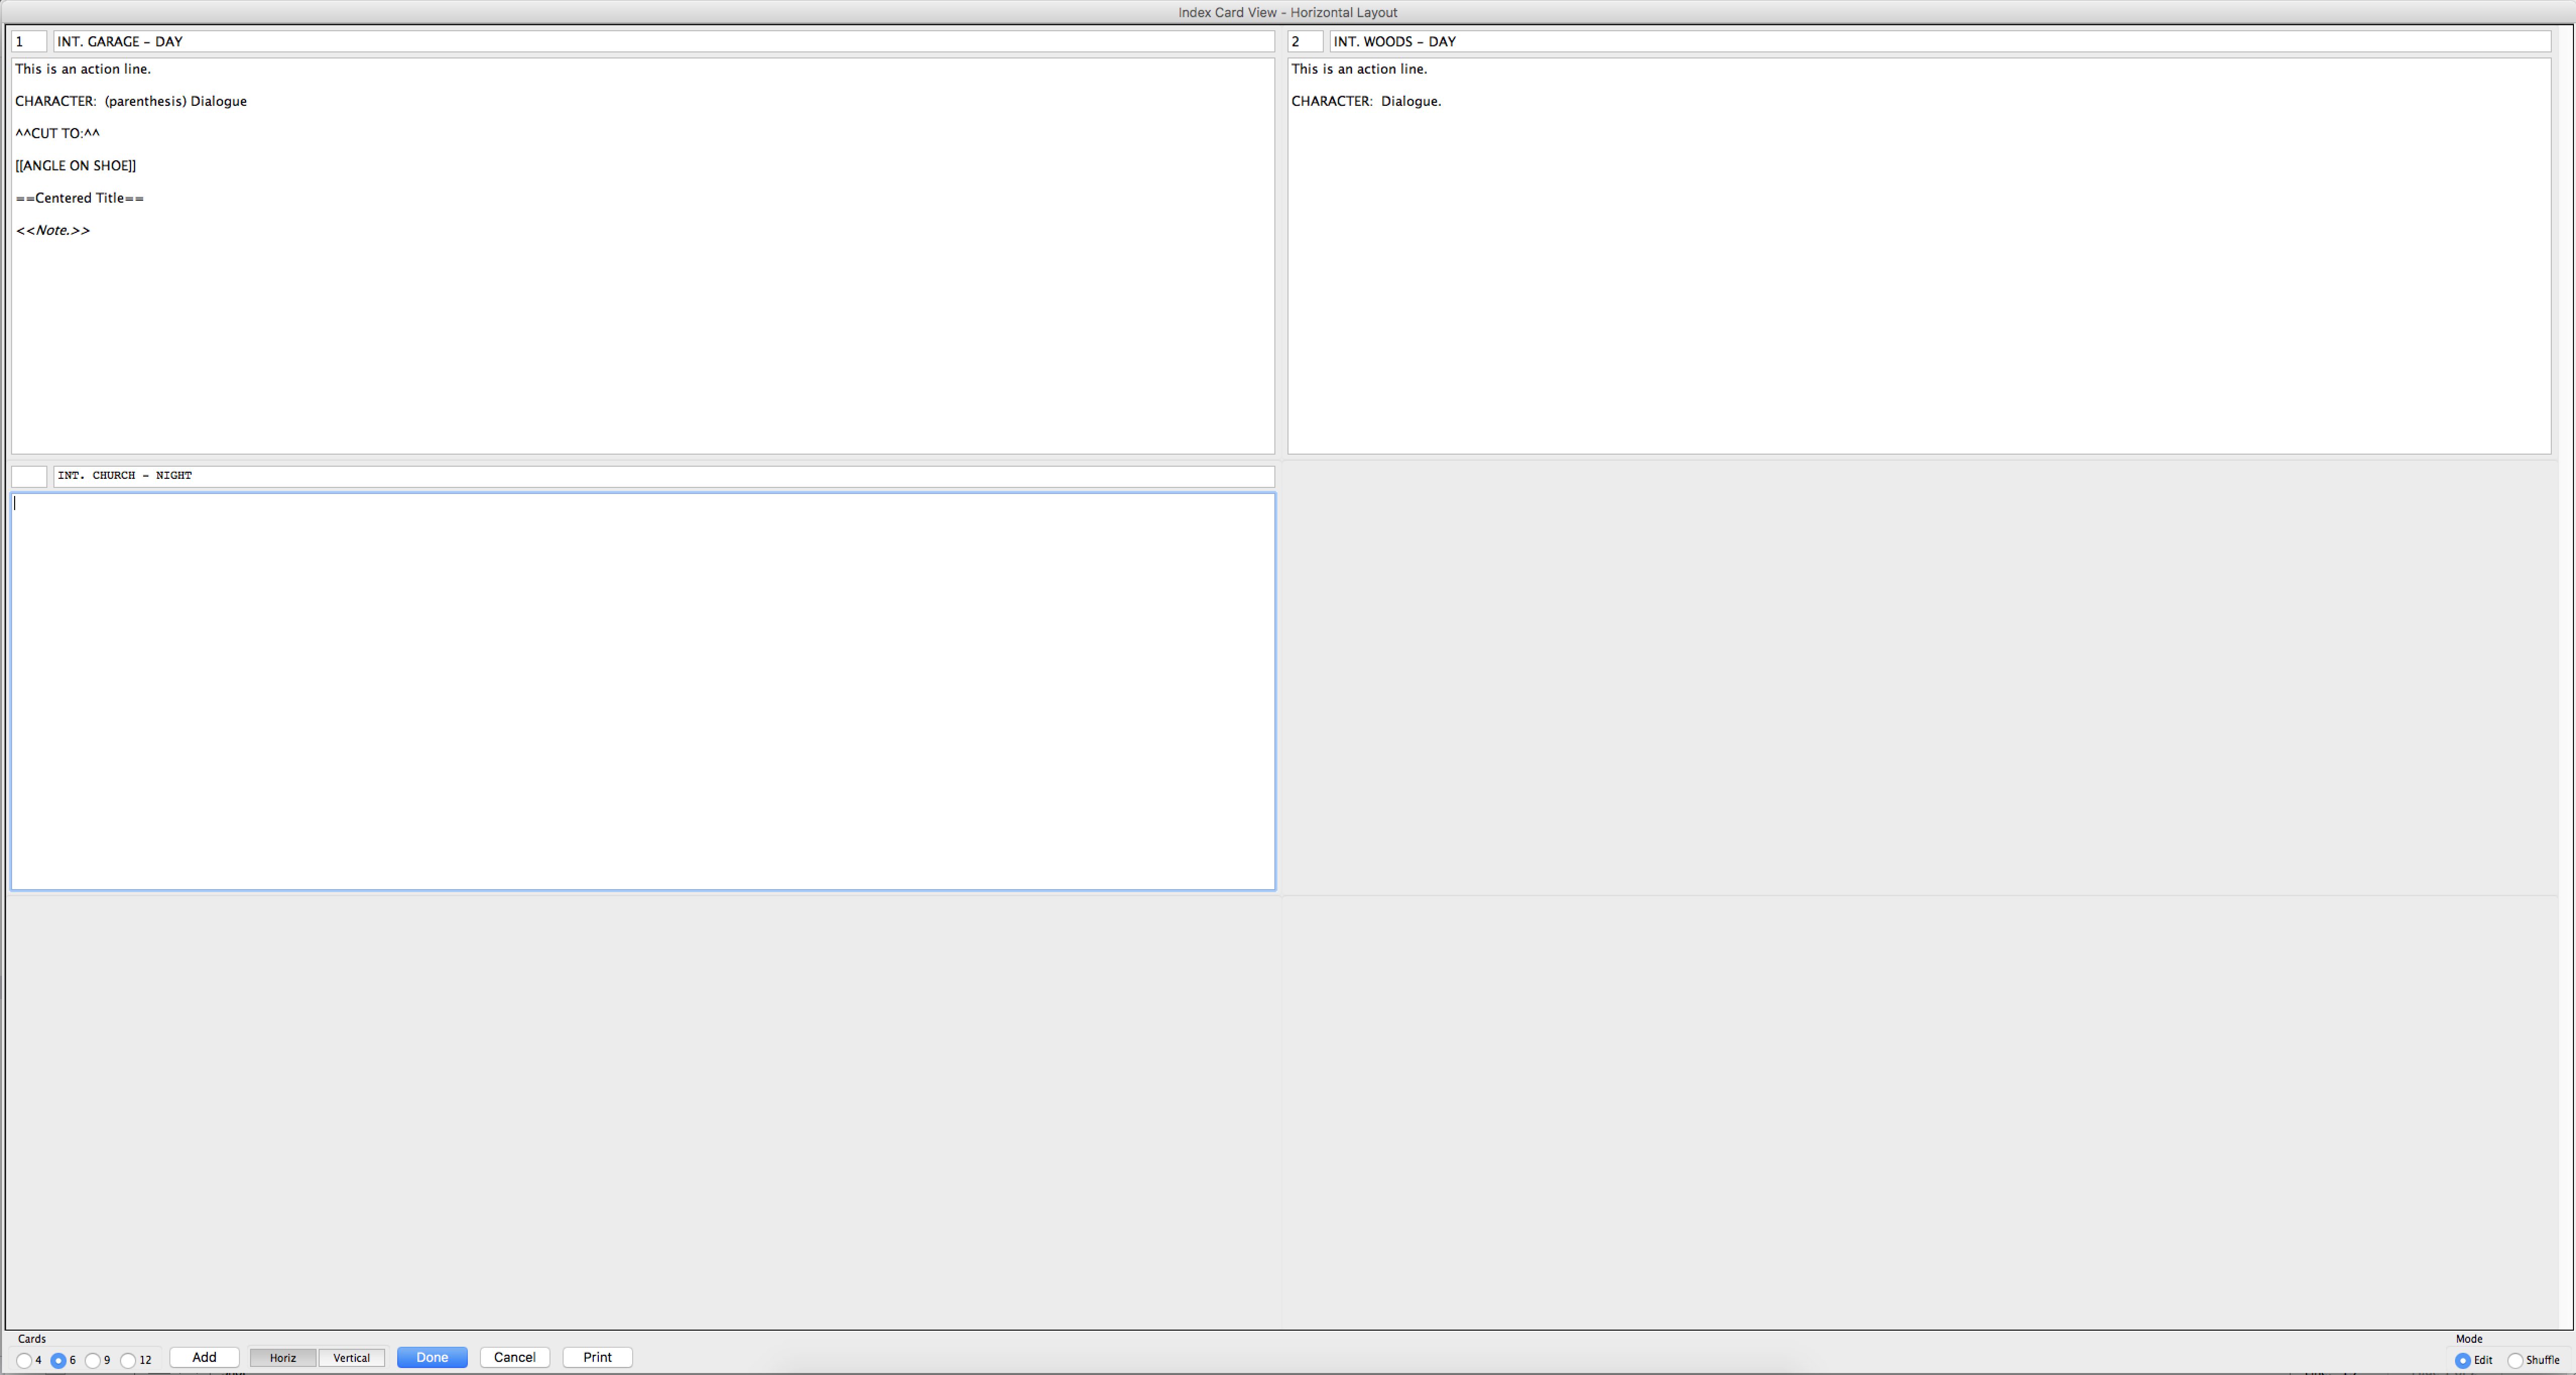
Movie Magic Screenwriter now shows you each scene on a different index card.
Every index card consists of the scene number in the top left corner, a scene heading right next to it, and the content of the scene in the big field below that.
Getting around the Index Cards View
Before we go deeper into how you can edit and move index cards in this view, let’s first look at some tools that the index cards window offers.
![]()
In the lower left you can decide how many cards you want to have displayed on one screen: 4, 6, 9, or 12.
Right next to that you have a button to add new index cards, and right next to that you have two buttons to choose whether you want index cards to be displayed in horizontal or vertical order.
With “Done” you can close the index cards view and save your changes, whereas with “Cancel” you can leave the view and Movie Magic Screenwriter will throw the changes you made here away.
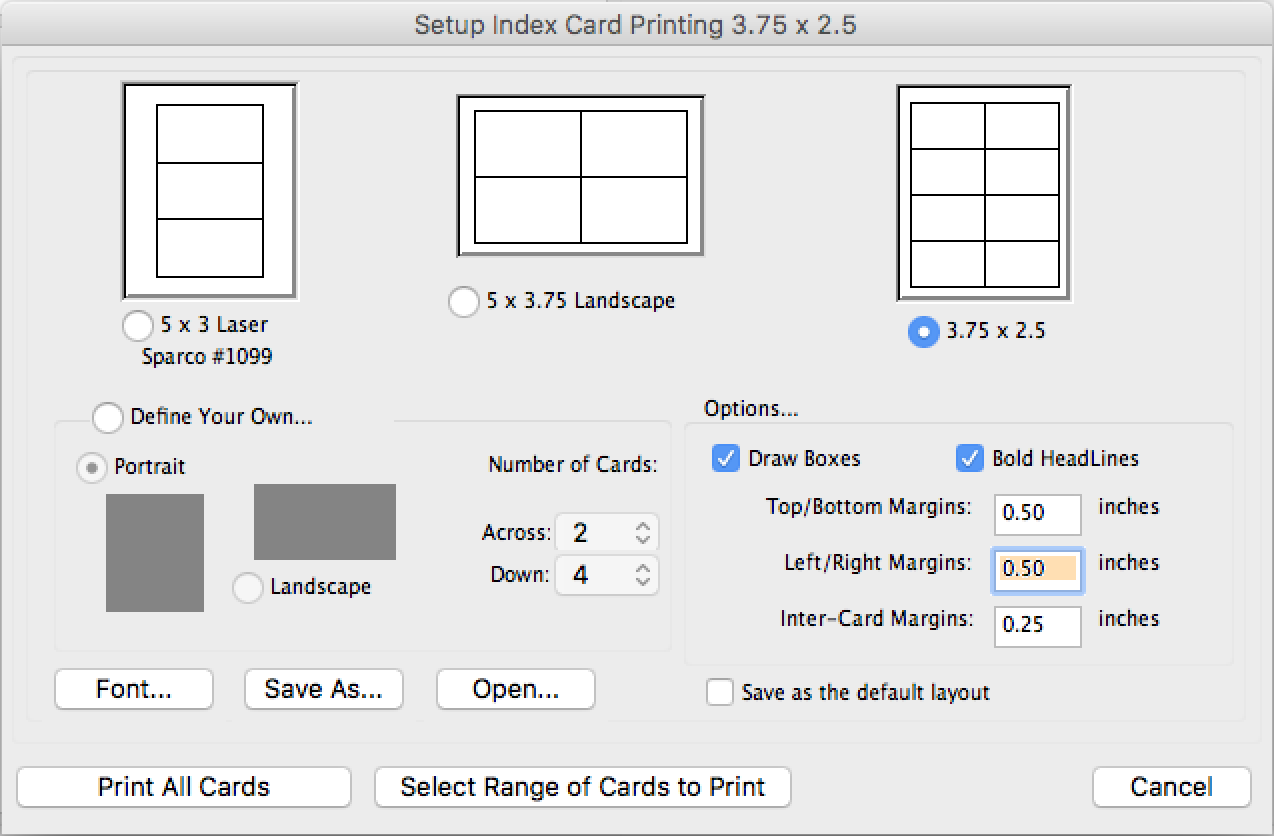
When you click “Print”, you can print your index cards on special index card paper, and so turn your virtual index cards into real index cards. There are several preformatted index card pages to choose from, or you can define your own format by defining how many cards you want to have spread across one row and how many rows you want to print.
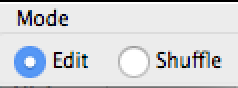
At the bottom right of the window you see two radio buttons that let you choose between “Edit” and “Shuffle”. Let’s look at editing index cards first.
Creating and Editing Index Cards
If you are in “Edit” mode you can fill this big content area of each of the cards with your script text, or edit it if the cards already holds some.
There is something that you should keep in mind though.
What you see here in the index card is the exact same text that you also see on the script page itself. The only difference is that the formatting works a little differently.
Let’s have a look.
I’ll go through each of the elements and show you how you can format them here in the index card if you want Movie Magic Screenwriter to recognize that formatting and create the correct script element out of it once you leaves this view.
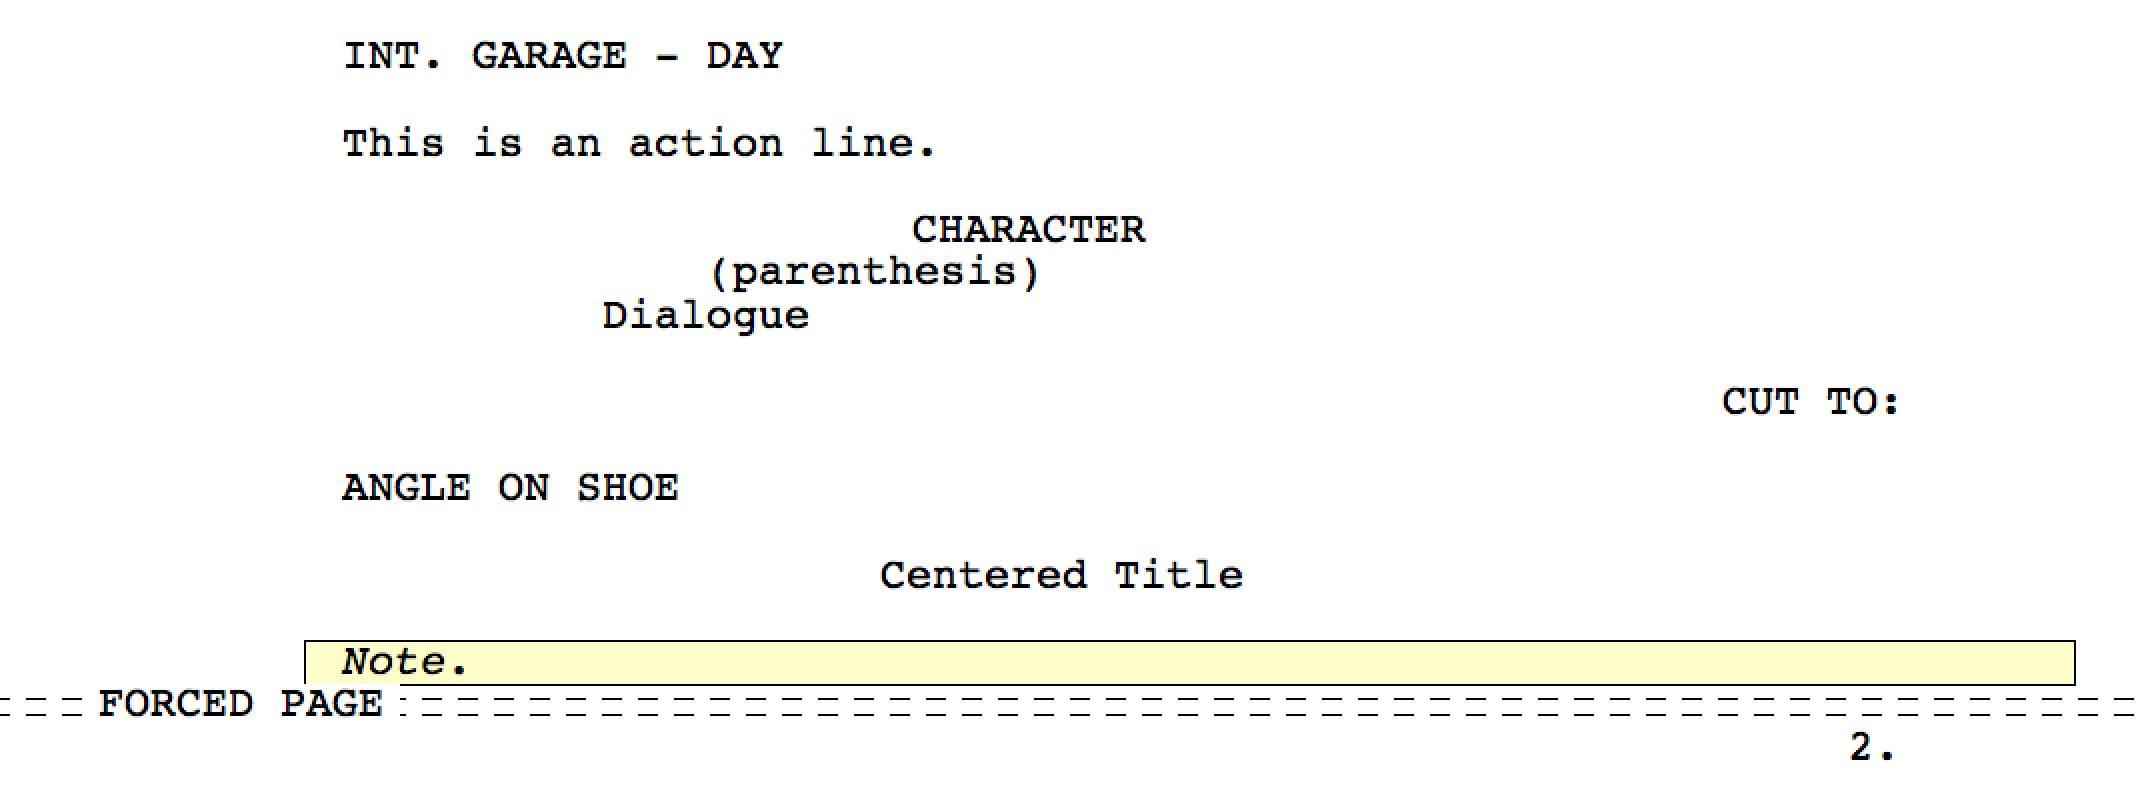
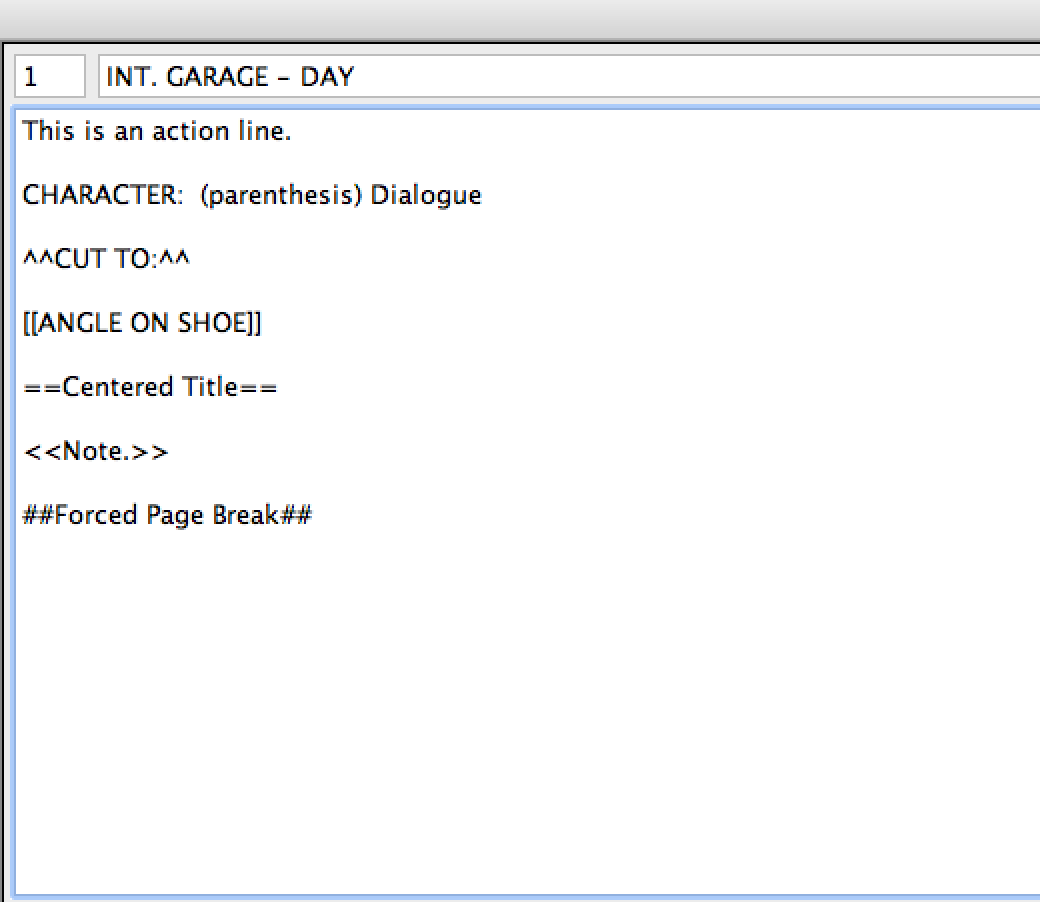
Scene headings are put up top in the bar right next to the scene number. You can put INT. Or EXT. Here, as well as time of day, but it’s not necessary. No matter what text you put in the header bar, it will be recognized as scene heading.
If you write any text in the index card content area without additional characters for formatting, it will be interpreted as action line.
Next, it’s important to have one blank line between each element.
If you want to write a character name, write it in ALL CAPS, followed by a colon and a space. Then put your dialogue there.
If you want to include parenthesis you can, just put the into the dialogue as well.
To create a transition, write it in ALL CAPS and put it in between two caret symbols before and after it.
To indicate shots, also write it in ALL CAPS, but enclose it with two square brackets beore and after it.
If you want to create a centered title, put it in between two equal signs at each end.
In order to create notes, write two “smaller than” << symbols, then put the note text, and then end it with two “bigger than” >> symbols.
To force a page break, write the text “##Forced Page Break##” with two number or hashtag signs at each end.
Alright, now that you know how all the elements are formatted, you can choose whether you want to write screenplay text or notes directly here in the index cards view, or if you just create all the cards here and then go back to the script view to change the text.
One more thing.
In case you’re unable to edit an index card, this might be due to the fact that the document contains locked page breaks, locked scene headings, act break or scene label information, or outline elements on the same level or higher than the scene heading document style.
Also, if you have cheated any elements, editing the scene’s content in the index cards view causes the “cheating” to be lost.
If you want to know more about what cheating is and how it works, there is another article on the topic that explains it.
Shuffling Index Cards
Alright, now that we know how to create and edit index, cards, what if we want to move them around to change the order of our scenes?
In order to do that, go to the bottom right corner and choose “Shuffle” mode.
Now, select the card you want to move to another place just by clicking on it.
You see that the card now turns grey and the mouse arrow turns into a hand holding an index card.
Now go to the place where you want to insert the index card (scroll there if necessary), and then click on the card that should become the next card after the one you’re moving. So, whichever card you click on with the hand holding the index card, the card you selected earlier will be inserted in front of it and the card you clicked on will be the next in line.
If you want to change the order of multiple cards, you can hold down SHIFT while you select the cards that you want to move somewhere else.
Then, same as before, click on the card that should become the next card in line AFTER all the cards that you selected earlier.