How To Protect Your Script With Watermarks In Movie Magic Screenwriter
Movie Magic Screenwriter Watermarks
If you are in the production of your project you will have to hand out your script to a lot of people and this sometimes leads to security concerns because you don’t want anyone to see the script except the people that need it in order to do their job on the production.
So, a way to protect your script in a way is to have it printed with watermarks. Although, it doesn’t really protect your script from theft or being leaked, the thinking goes that people will be much more careful with it if their name is printed on every page, so in case it would get stolen or leaked, at least you’d know whose script it was.
Movie Magic Screenwriter gives you a lot more flexibility and setup options when working with watermarks than many other screenwriting applications.
Let’s look at how this works.
Set up Watermarks
In order to have access to the watermark functions in the print dialog we need to set up the watermark itself first.
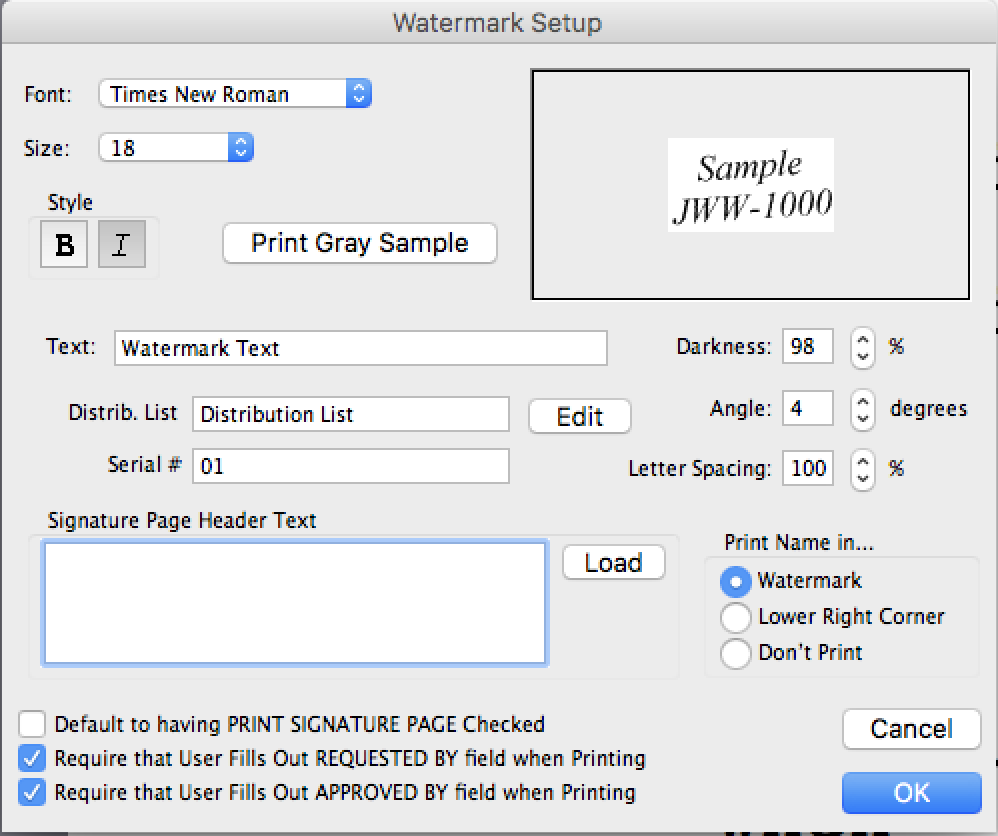
For this, go to “Production – Watermark Setup”.
 Now let’s go through all the settings and see what they do.
The first ones up top are pretty clear, obviously you can set up font, size and style for your watermark.
Then, you have this button that says, “Print Gray Sample”. What this does is, if you click it, it will print out a whole page with percentage numbers that indicate how different percentages of grey look on the page.
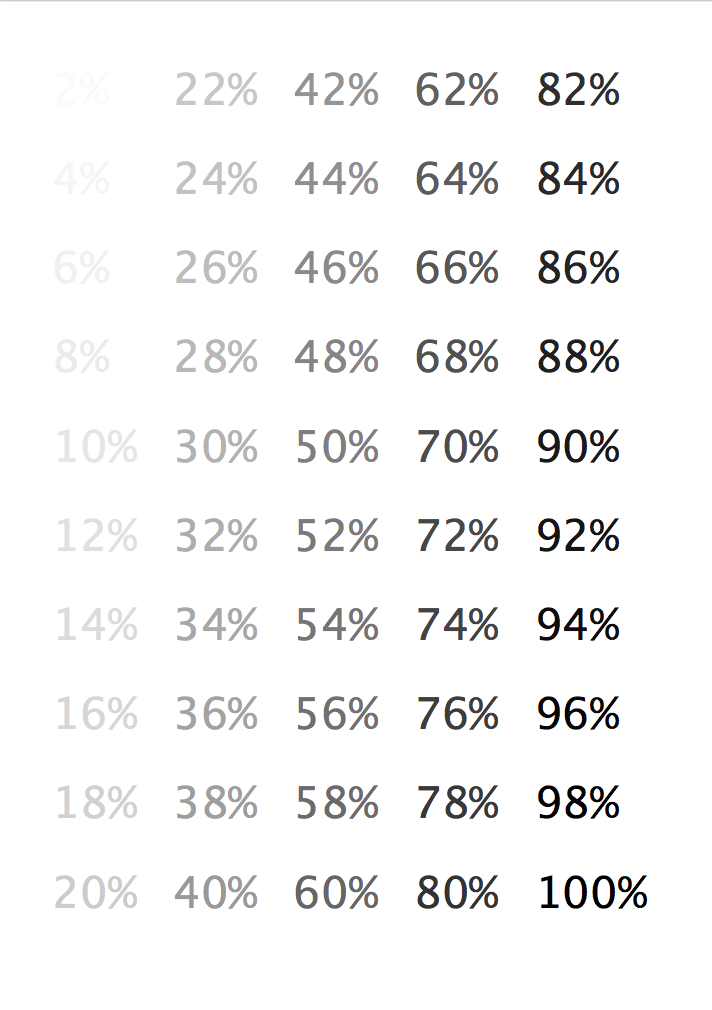 Because you don’t want the watermark too dark, because then it will be hard to read or your script might be hard to read because of it. And you want neither of those two things.
On the other hand, you don’t want the watermark to be too light, because it should be readable.
And this grey sample page helps you decide really quickly what you want to put into the “Darkness” field, which is exactly this, how light or dark will your watermark appear.
Then, below the darkness field you can set an angle for the watermark, how much you want to have it rotated.
And below that you can define the letter spacing.
So far so good.
Now let’s look at the rest of the settings that have to do with the actual watermark text.
In the “Text” box you put what you want the Watermark to say, really. This could be the name of the script, the date, whatever you want, really.
You don’t have to put the name of the person receiving the script in here, because for this we have distribution lists.
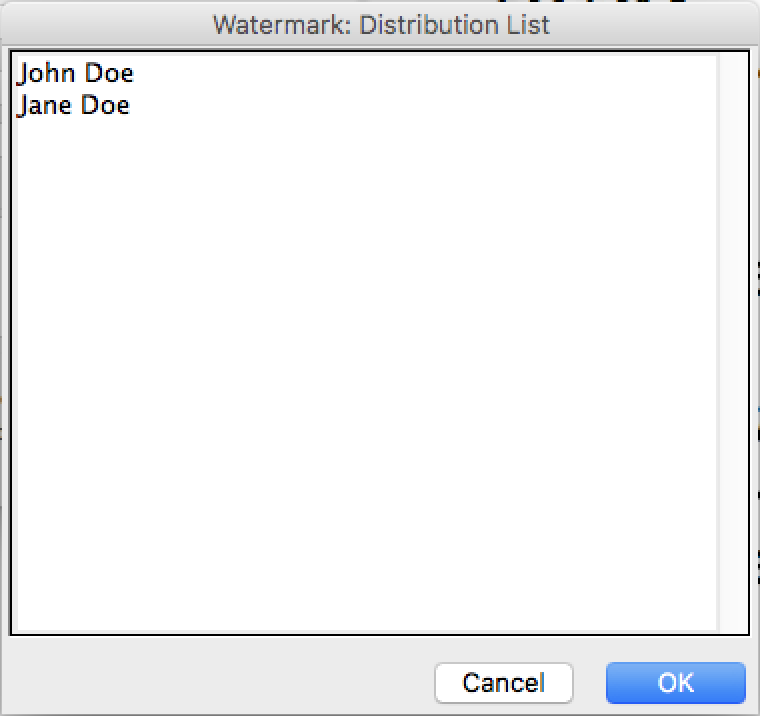
In the next text field down below you see that is says distribution list, and when you put some text in there, the button next to it changes from “Load” to “Edit”.
Distribution lists are lists of names of people who will receive this script and Movie Magic Screenwriter can print the script with a different name on the watermark on each printout. That’s what distribution lists are for.
You can use these distribution lists either like we’re doing it right now, by entering a name for the distribution list in the “Distribution List” text field, and then, putting the name in the text box that opens up when you click on “Edit”, with each name being on an extra line.
 Or, you can delete the name of the distribution list and then click on “Load” and load a simple text file that contains all the names on an extra line each. That way you can store your distribution lists in a different location, independently from the program. Or, for example, somebody else could create the list for you and then give it to you and you just load it instead of having to type it or paste it in.
By the way, once you give your distribution list a name inside of Movie Magic Screenwriter, and fill out some names in the text box when you click on “Edit”, the program will remember the list associated with that name.
So, if you want to go back to a distribution list that you created earlier in Screenwriter, you just need to remember the correct name, and if you enter it in the “Distribution List” field you will have all the names on the list.
In addition to the names you can add a serial number, just enter a number in the “Serial #” field in whatever format you like and Screenwriter will use that number and increment it with every name that appears on the distribution list.
Below the “Serial #” field you have a text field that says “Signature Page Header Text”.
Movie Magic Screenwriter give you the possibility to create a signature page for you with all the names that appear on the distribution list, so you could, if you hand out the script to them, have them sign that they received it.
If you want to use that function you can put a text that will appear in the header of that signature page in that box.
You can also load in text from a simple text file via the “Load” button on the side.
Then, if you take a look at the right side of the window, just above the “Cancel” button you see three options having to do with how and if the name is printed.
If you want just the watermark text that you put in the “Text” box to appear in the middle of the script page but not the name, you can choose if you want to have the nae printed instead in the lower right corner, or not at all, depending on which of those settings you choose.
There are three options left to look at at the bottom.
First, you can check if you want to have “Print Signature Page” checked in the printing dialog by default or not. So, if you never need the signature page, or if you always need it, you can set the default here, so you don’t have to change that setting every time in the print dialog.
Also, there are two fields that you can add to the print dialog if you want, these are a “Requested By” field and a “Approved By” field. If you activate the checkboxes for them here, they will appear in the print dialog and you will have to fill them out in order to start the printing process.
Printing Watermarks
Now, having setup the watermarks the way we want we can go to the print dialog. Just set it up with whatever settings you like, and then, when you hit “OK”, the “Watermark Printing” options will open.
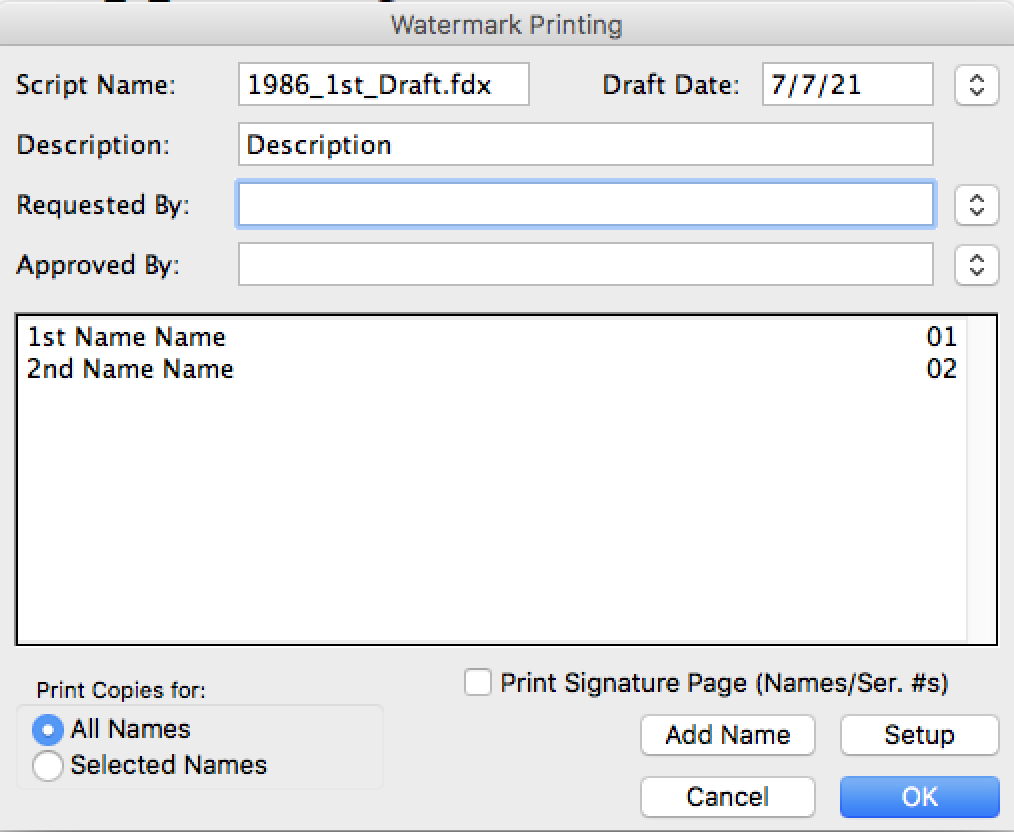 You can enter the script name, the draft date, the description, and here you see these “Requested By” and “Approved By” fields that we checked earlier in the settings.
Then, below, you see the distribution list, and at the bottom you can select if you want to print all names or just selected names. To select names, click on the names in the distribution list and to select multiple names hold down Shift or Cmd on the Mac, Ctrl on the PC when selecting the names.
You also see that signature list setting here, you can choose to print the signature page or not.
You can also add names to the distribution list here, in case the list changed, and in case you need to change the watermark settings you can click on “Setup” and this will take you directly to the watermark setup window we saw earlier.
One more thing about creating pdf’s with watermarks. If you just use the print preview function of Movie Magic Screenwriter, the watermarks may not be visible.
If that’s the case, just go through the whole print dialog, and then in the last window that opens after the watermark window, the last print window that opens, where it shows you the printer, select a pdf printer or the pdf preview option in the lower left corner if you’re on the Mac.
That way you can produce pdf’s that have the watermark included.
And that’s it. That’s watermarking in Movie Magic Screenwriter.
As I said, it has more functionality than many other screenwriting programs, what also means that there are a lot more settings to learn and take care of, but it’s really not that hard. If you’re not sure what one of these functions or text fields does, just print a sample and it will become clear to you immediately.