Highland – Fountain Screenwriting Markup Language Introduction
Fountain Introduction
When it comes to screenwriting applications, one of my very personal favorites is Highland 2. And while I always use other applications every now and then for different writing purposes and also for testing, I always find myself going back to Highland to do my own real writing.
And with “real writing” I mean the actual writing of the script. I use other applications for developing and for outlining, although you could also use Highland for that if you wanted, but I think when it comes to the writing itself, no other screenwriting application has come close to the experience you have in Highland yet.
And the reason for that is its simplicity. You have everything you need, plus maybe a little more, but it’s not bloated with a ton of features. It gives you exactly what you need to do the writing itself. It’s very lean, it’s very quick, it’s kind of simplistic in a positive way. I love it.
Something that is very different about Highland and that makes it different from all of the bigger screenwriting applications is that it has been built from the beginning around the fountain format.
So, before we go deeper into what Highland can do, let’s first take a little detour and take a look at the fountain format itself. This will help you understand better and more quickly, how Highland works and why it works that way.
And don’t worry, it’s all very, very easy and simple. In a good way.
The Fountain Format
Fountain is what is called a simple markup syntax for writing, sharing, and editing screenplays in plain, human-readable text.
That’s what the website says.
Now, what does that mean?
By the way, if you want to check out the founain website, go to https://fountain.io/. It has a lot of useful information about fountain, how it works, what apps support it and so on and so forth.
But we will cover the most important parts here in this article.
So, what does that mean, “a markup syntax for writing”.
This is best demonstrated with an example, and for this I will open Highland and click on “New” to create a new file.
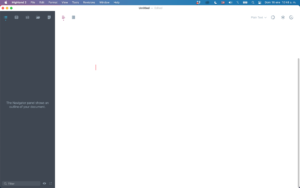 What you see here is just an empty editor, and you can type anything you want, and the way it is set up now, what you write, is exactly displayed the way you write it. It’s a bit like if you were to use a simple text editor like “Textedit” on the Mac or “Notepad” on the PC.
When I write a scene heading now for example, I just type it they way scene headings are supposed to be, which is all caps.
And you can see as I type, Highland recognizes that I’m typing a scene heading and it offers me to complete things like “INT.” for “interior” or “DAY”. Like many other screenwriting applications do.
But what we don’t have here is an element selector. Most other screenwriting applications have some kind of selection where you pick and define, which line is which kind of element, for example scene heading, action line, character name, and so on and so forth.
Here, we don’t have that because we don’t need it.
Let’s continue and see why.
Now, after the scene heading, I’m making a double line spacing here by just hitting the enter key twice, and then, what comes after the scene heading? Exactly, the action line. Usually.
So, let’s type an action line.
OK, so this is all well and good, but what if I want to use a character name element? The character names as well as the dialogues, and other screenwriting elements, have certain indentation settings. What about those?
Let’s see.
I’m typing a character name here in all caps, because that’s how character names should be written in screenplays, and you see Highland just places it at the left side of the page along with everything else.
“But this is wrong”, you might say, and in a way you’d be right about that. But bear with me just for a second, you’ll see what that’s about in a second.
Let’s just give this character a line of dialogue first, so we see how the formatting works here.
The dialogue line goes directly below the character name. Alright.
Okay, now what you see here are the very basic screenwriting elements that you will use most often:
- Scene Heading
- Action line
- Character name
- Dialogue
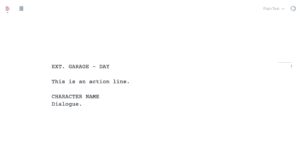 Now, you see the little screenplay page icon at the top of the screen, in the upper left corner of the editor area?
Let’s click that and see what happens.
When we click that, Highland changes to preview mode, and we see it looks a little bit more like a screenplay page, and the font is a screenplay font now, but you might say, “hey, what about the formatting? It still isn’t anything like screenplay formatting.”
That is because – if you take a look at the upper right of the screen where it says “Plain Text” – I put this document into plain text mode because I wanted to show you the difference between plain text mode and screenplay mode.
Right now, Highland works just as any other plain text editor as in, it just takes what you write, and it does nothing with it. It just displays it in the exact same way that you put your text on the page.
But we can change that.
If we click on the “down arrow” where it says “Plain Text”, we get a selection of formats that we can use to format or style our document.
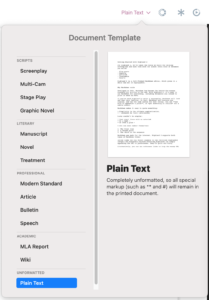 And here you see that Highland is not only for screenwriting. It was built with screenwriters in mind, yes, but also for novelists, and other writers.
Because what Highland basically is, is a plain text editor that has the capability of interpreting the formatting of the text in different ways.
And one of those ways is: screenplay formatting.
So, let’s choose “Screenplay” from the formatting list and see what happens.
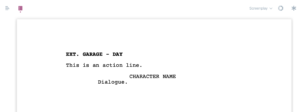 Now this finally looks like a screenplay page. The scene heading is a bit boldened so it’s easier to distinguish, the character name and the dialogue are indented, and also the line spacings are according to industry standard.
If we now go back to the editor, we see that Highland here also has indented the character name and the dialogue for us, because now it knows that what we’re writing is a screenplay.
 But the important thing is that, although we see this now indented on the page, this is just the way it is presented here in Highland, because Highland knows how to interpret the fountain format.
Technically, this is still only a simple plain text file.
The only reason, Highland can display this as a screenplay is, that when we tell Highland that is should interpret the text as screenplay, it follows the formatting rules of the fountain format, and what that basically is, is a set of rules that define, how a screenplay should be formatted.
For example, for this to be interpreted correctly by Highland, we need to have a double spacing after a scene heading.
It’s quite easy to figure out for fountain what a scene heading is, because they always start with “INT.” Or “EXT.”.
Then, when we have two line spaces after that, fountain knows, what comes next is an action line.
The same with character names and dialogue. They are always used in the same way. You have a character name written in all caps on its own line, and the next line has the dialogue.
So, this is also quite easy to figure out for fountain, because every time you have an all-caps line, that is followed directly by another line, it’s going to be a character name element on the first line, and a dialogue element on the second line.
And with these basic rules, if the application you are using, in this case Highland, knows these fountain rules, it automatically knows which element is which.
Markup Syntax
Although, there are situations – and now we come the part about what “markup syntax” really means – there are situations where you might want to tell fountain to apply special formatting because you need certain text to be interpreted in a certain way.
For example, let’s say you want to create a scene heading, but you don’t want to type “INT.” Or “EXT.” Because you either don’t know yet, or, you’re just typing a draft and want to indicate a scene change, but right now you don’t care about the specifics of the scene heading format, you just want to continue writing.
In that case, you need a way to tell Highland where to put the scene heading.
And you do this by simply typing a “.” (Dot) character in front of the line. This way, Highland knows that it should create a scene heading element here, although it doesn’t start with “INT.” Or “EXT.”.
And this is what is meant by “markup syntax”. For all the situations where you need special formatting that can’t be automatically recognized by fountain, or rather, the app that uses the fountain format, you have a very simple, easy to learn syntax that you can use.
Fountain Compatibility
Now, at this point you might ask yourself, okay, this is all well and good, but it’s still a lot easier to jump through my screenplay elements in Final Draft with TAB and ENTER, I don’t want to type special characters only to tell the software what it should do.
And if that’s your preferred choice, you’re more than welcome to do so. You decide which way you prefer to write.
But there are some things that you should consider, where the real strength of fountain comes in.
If you know these very basic fountain rules, and they are really easy to learn and most of them are very intuitive anyway, you don’t need any special screenplay application to write in fountain format.
And that’s the beauty of it. The definition of how the fountain syntax works is open source. It was created by John August, as was Highland by the way, the screenwriter of “Big Fish”, “Charlie and the Chocolate Factory”, and he also worked on the latest “Aladdin” movie.
The fact that it is open source means that every software developer can use it and implement it in their software. This, and the fact that fountain files per se are nothing more than simple text files that can be opened by any writing application on any operating system, make you absolutely independent from a certain software vendor.
If you open a fountain file in a simple text editor that does not know how to interpret it correctly as a screenplay, you will have all the character names and the dialogue flush left, and you will see the fountain syntax every now and then when you need it.
 But it is still easily readable. You could even open it on your phone on any app that can import simple text, which almost every app can do, or, you could even open it and change it on your old computer from the 90’s if you wanted to.
This makes it also very future proof and a great backup format.
Convert to Final Draft, pdf, …
And, you can convert fountain easily into other screenwriting formats if you need to. You can convert it to Final Draft and pdf, which are probably the formats you may need most, but more and more screenwriting applications support the fountain format for import and export. This basically eliminated, or at least reduces conversion problems when going from one software to another, a lot.
Alright, so I hope I could give you a brief introduction to fountain, we will look at it in more detail in future articles, so you will fully understand how you can use it easily, quickly, and safely for your writing endeavors.
