How To Import Your Files Into Celtx
Celtx Import
Chances are, if you are new to using celtx, you already have scripts written in another software, and you want to import them into celtx to use them there.
To import material into celtx, go to “File – Import”.
Here you have two options: import from file, or from projects.
Importing from Projects
If you choose “from projects”, celtx shows you the other projects that you have, and you can select, from with one you want to import the screenplay.
The screenplay of that project you import will then be appended at the end of the current screenplay in the project you are right now.
Importing from File
If you choose import from file, you just select a local file from your computer.
According to the celtx documentation at the time of this recording, the following importing formats are supported:
- Celtx (.celtx, .cxscript)
- Microsoft Word (.doc, .docx)
- Simple Text (.txt)
- Final Draft (.fdx)
- Rich Text (.rtf)
- Webpages (.html)
- Pdf (text-based)
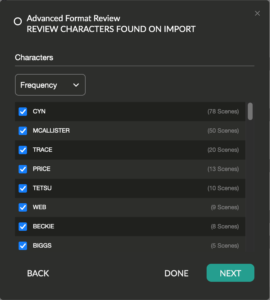
When you choose a file to import, celtx shows you an import summary, how many scenes and how many characters have been imported.
 If you click on “characters” or “scenes”, you get a list of all your characters, or scenes respectively, and you can select, which of those you want to import or not.
 Also, you have a filter menu at the top, with characters, you can sort them by frequency, or ascending or descending, with scenes you can select to view all or just interior or exterior scenes.
When you’ve made your selection, in case you want to change something here, click “Done”, and then “Go to Script”, and celtx will append the content of the imported script to the current screenplay document.