Outlining In Celtx With Index Cards
Celtx Index Cards
In this article we’re going to see how you can use celtx index cards feature. Some form of index cards if found in pretty much every screenwriting application, or at least most of them, but the form they handle them can vary a little.
So let’s see how celtx does it.
Index cards are, as the name suggests, a digital representation of paper cards that you would stick on a wall or a cork board, and that hold little pieces of your story. The nice thing about them is that you can move them around freely and play with different structures until you have found a version that you think might be worth writing or exploring further.
In celtx, there are several ways to display your index cards, so let’s look at the first one.
Index Cards via the Quick Access Toolbox
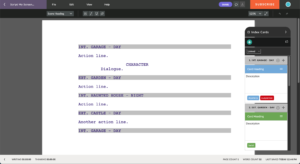
With your script page open, you see the quick access toolbox at the right side of the screen and there should be an “Index Cards” button.
If you don’t see it go to “View – Tools” and check if the Index Card option is checked.
If you click the “Index Cards” button in the quick access toolbox, the toolbox itself changes to a narrow index cards panel.
 Linked Index Cards
By default, celtx assigns one index card to every scene, so if you have scenes in your script already, you will see one card for each, with the scene heading being shown at the top of the card.
At the top right of the card you have a little “plus” icon, and when you click it, this will add another index card to that scene. This is a nice feature in my opinion. Many writing applications just assign one index card per scene and that’s it. Here, you have add multiple cards to one scene, which makes sense, when you think about it. You might want to add several pieces of information to one scene, there might be a lot going on, and this way you don’t have to cram it all into one card.
As for the content of the card itself, you have three fields that you can use:
- Heading
- Description
- Tags
There’s not a lot to say about the heading and description fields, you just give the card a title in the heading field, and in the description field you put the index card’s content. This might be just a rough idea or maybe even a draft version of that scene, or part of that scene.
In the tags field, you can just enter a keyword that you want to assign to that card. That could be anything, like a character name for example, or, a story function, like for example, suspense, danger, mystery, reveal, and whatnot.
You just type in the tag name and then press the comma (“,”) sign to separate tags in case you want to add multiple tags to one card.
If you click on the little pin icon, or light, or whatever it might be, you can select a color for that tag. Celtx will then automatically color the whole index card in the color of the first tag. If you have several colored tags in one index card and you want to change the color that the index card itself is shown in, just click-drag the tag that you want to use the color from, to the first spot in the tag list and the index card color will adapt accordingly.
In the hamburger menu right next to the “heading” field you have several options. You can insert another card after the current one, you can delete the card, you can link it to another scene, or you can unlink it.
We will have a look at unlinked index cards in a second.
If you want to link it to a different scene, just click “Link to scene” and a scene list opens up that lets you choose which scene you would like to link the card to instead.
Unlinked Cards
Now, all the cards that we see here are linked to a certain scene. You can see that because we see the scene heading of the scenes at the top of the cards, but also because the dropdown menu up top says, “Linked”.
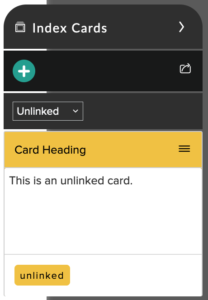
If you choose “Unlinked”, the view changes and it shows us only unlinked cards, that means, the cards that are shown or created here have no releation to scenes. They are just index cards with the same fields that you can use – heading, description, and tags – but they are free from the script so to speak.
 So, in case you just want to generate story ideas without even knowing how these might be represented in scens later, unlinked cards may be the right choice to use.
Again, you have the “plus” button at the top to create as many cards as you like.
And in case you want to link that card to a specific scene, go to the hamburger menu, and choose “Link to scene”.
Index Cards View
Now, this view that we have here, is very practical if you want to have a quick view, or a preview, if you want, of your index cards side-by-side with your script.
But what if you need more space, or you don’t necessarily need the script page right now?
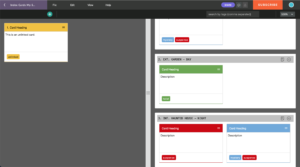
Then you can open these index cards in their own tab by clicking on the “open document in new tab” button at the top right of the index cards pane.
 (You could also open that index cards tab if you select the “Index Cards” view from your project view instead of going directly to your screenplay.)
What you see in the in the index cards view are two windows next to each other, with the cards without link to the screenplay on the left side, and the linked cards on the right side.
You can move the bar that separates the two windows in the middle left and right to make the two windows bigger or smaller.
What you see here is basically the same what we saw earlier in the index cards pane right next to the script, just with more screen space.
One thing that you have here, that we didn’t need in the other view, because we had the script page right there, is this scene preview button for the linked cards. If you click on the “page” symbol in the scene slug line on the right, you get a preview of what the scene looks like in the script in case you need to refer to that.
So, that’s basically it.
One more thing perhaps, that’s nice is, you have a tags search box at the top. If you enter the name of a tag you can filter the view and only the index cards that have a certain tag set will be displayed.
I imagine this can come in handy when you have a lot of cards and need a way to keep track of what’s happening.
Also, in this view, you can drag cards around. You just grab the card anywhere on the card itself, and then just drag it to the place where you want to have it.
And this way you can create story ideas, outline, and keep track of everything that’s happening in your script or novel in celtx.