Dual Dialogue in Arc Studio

Buy Arc Studio now:
In this article we’re going to have a look at dual dialogue in Arc Studio.
Just in case you’re fairly new to screenwriting and don’t know what that is, no problem.
Dual dialogue means that you put two lines of dialogue in the script right next to each other on the same line to indicate that two characters say their lines at the same time.
You might not use that too often, but every now and then you need it, and then when you don’t really know how do do that, it might get you out of your writing rhythm because you’re fighting with your screenwriting software instead of continuing your creative flow.
So, let’s see how it works to get it out of the way.
First, write the two blocks of dialogue that you want to have next to each other, right one after the other, like you would if they were talking one after the other.
So, first you write the dialogue for the character that you want to appear on the left side of the page later, and then, after that, you write the dialogue for the character that you want to have on the right side.
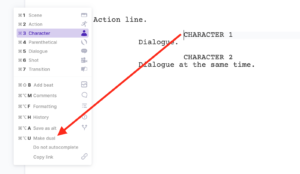
 Then, you put the cursor in the line of the character name of the first of the two characters.
Then, either right-click where the cursor is, or, click on the screenplay element symbol at the left side of the page (in this case the “character” symbol), and then choose “Make dual” from the menu that opens up.
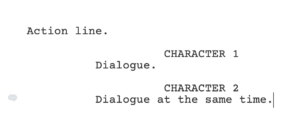
 Now you see the two blocks of dialogue right next to each other. The character and the dialogue that you put at the top is now on the left side, and the character and its dialogue that you put below, is now on the right side of the script.
That’s basically it.
In case you want to break the dual dialogue, and have them appear one after the other again, very easy to do.
Just click on the speech bubble icon on the left side of the page and choose “Break Dual”.
Now you’re back to the normal dialogue sequence you had before, character 1 speaks first, and then character 2.

Buy Arc Studio now:
