How To Create And Use Template Documents In Scrivener
FREE LIVE WEBINAR (This Sunday!):
Write and develop your Script with Final Draft 12.
We go from idea to outline to draft. Click the button below for details and to sign up:
Scrivener Template Folder
When you’ve been using Scrivener a while, after some time you will probably notice that there is some kind of information or some type of documents that you will use over and over.
This could, for example, be pre-filled text in some documents that you want to use, like for character sheets or other types of sheets that you just want to fill out.
Or, you want to have a certain kind of formatting already set apart from the overall project formatting and you don’t want to reformat every new document.
Or, you want certain types of documents to be used in certain folders, but not in others.
All of this can be done with template documents in Scrivener.
So, let’s look at how this works.
Creating A Template Folder
In order to use template documents in a Scrivener project, you need to create a template folder first, in case it doesn’t already exist. If you’re using one of the pre-defined templates most probably you already have one.
If you don’t, and you want to create one yourself, you need to create a folder first that will become the template folder.
Just choose any folder that you already have, and that you want to become the template folder, or create a new folder.
Then go to the project settings under “Project – Project Settings” and there you see the section “Special Folders”, and if you click it, you can select your template folder on the right side of the window from the dropdown. Just select the folder that you want to hold your template documents.
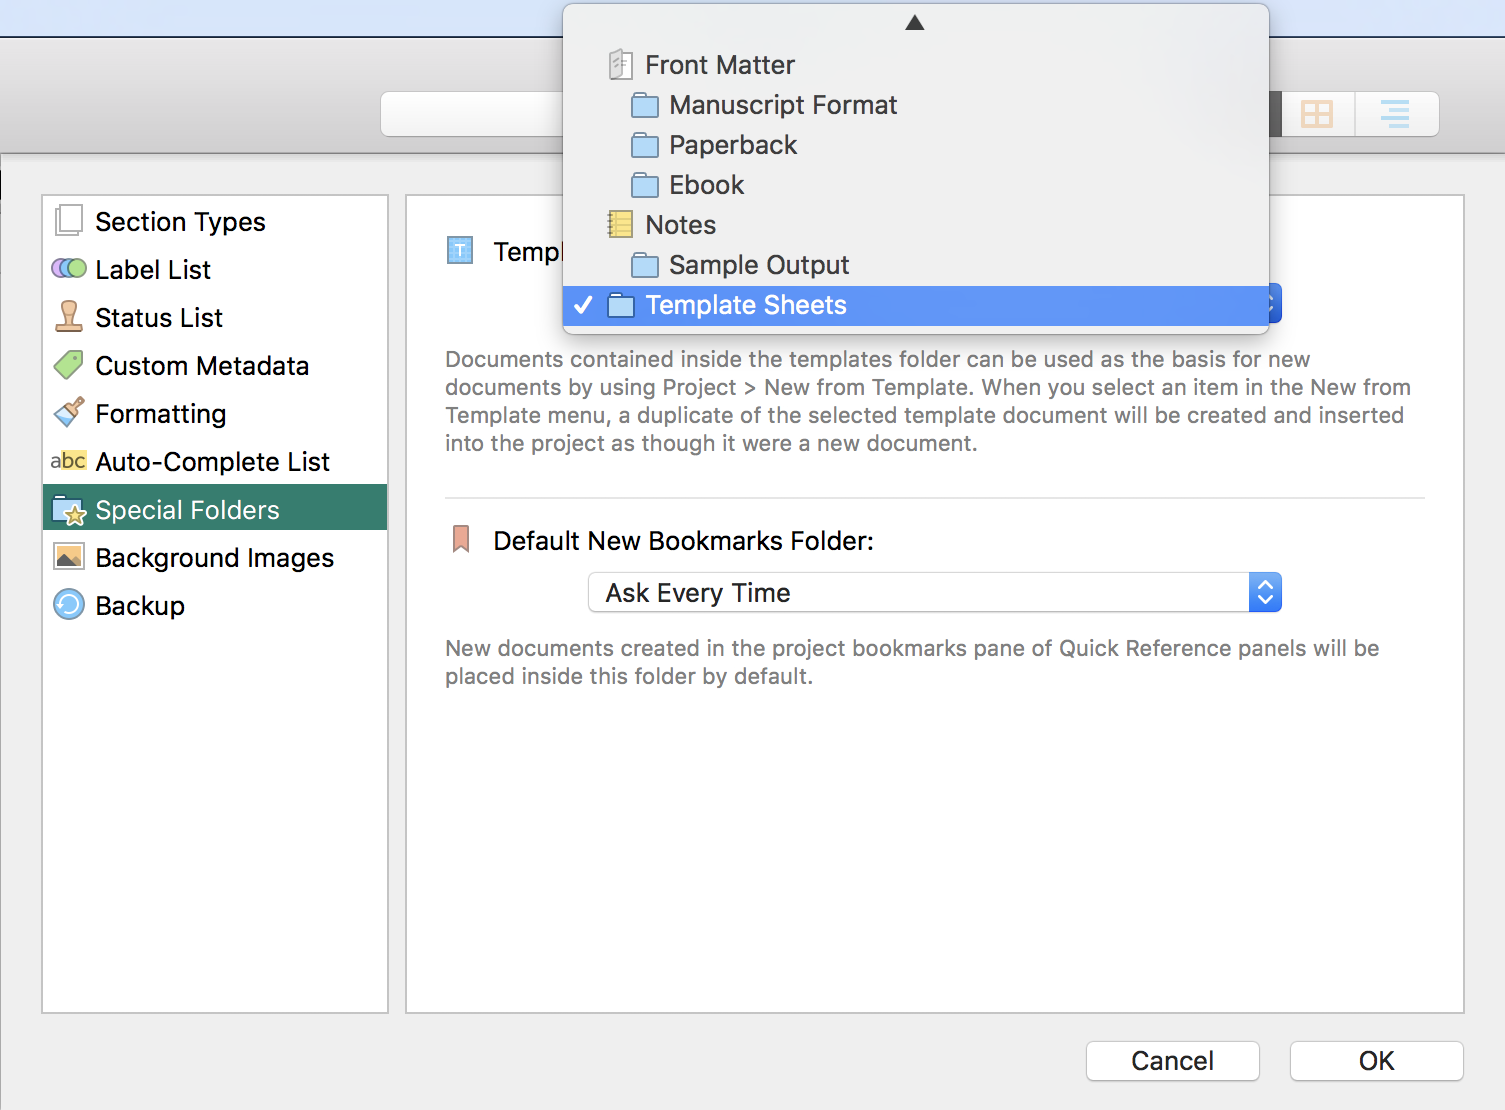 If you now take a look at the template folder you see that its icon changed. It now has this blue “T” icon to distinguish it easily from the other folders.
Template Documents
In general, any document can be a template document, it’s just that for some documents it probably won’t make much sense.
But you can drag any document in your template folder and it will be stored there.
So, creating template documents is easy. You just create a new text document (or whatever type of document you want it to be), you set it all up the way you want to, and then you drag it into the template folder. That’s basically it.
Creating New Documents from Templates
Now, if you want to create a new document from your template document, just go to “Project – New From Template” and you see that Scrivener shows you the documents inside your template folder now in this menu.
You can also access them from the toolbar if you click the down arrow right beside the “plus” button and choose the document you want to use as template to create a new document in your binder.
 So, basically, what creating a new document from a template does is just duplicating the document and placing it in the binder.
The nice thing about using templates instead of creating new blank documents is that template documents can hold pre-filled text, of course, but not only that, they also have the meta data information of that template document, so for example you could create templates that already have certain label, status, and other meta data information set, for example, if that document will be included in the compile or not.
If you want to get rid of a template document, just move it out of the template folder to convert it back into a “normal” document so to speak, or just delete it by putting it in the trash.
Defining Template Document Format
If you want a template document to have a certain formatting that differs from the overall project formatting, just put a little bit of placeholder text into the template and format it the way you want the document formatting to be.
This placeholder text can then easily be deleted if you select that placeholder text in the template document.
If that text is selected and you create a new document from that template, the selection will also appear in the newly created document, and if you just start typing, this selected placeholder text will automatically be deleted.
Sub Document Templates
Now, let’s suppose you want to create certain types of documents from templates in different folders. For example, if you have a characters folder, most probably you will want to create character sheets inside that folder.
In order to do that, make sure you have a character sheet template in your templates folder, and then select the folder in the binder that you want to set the default templates for, in this example this would be the character folder in which you want to create your character sheets, and then go to “Documents – Default Template for Subdocuments”.
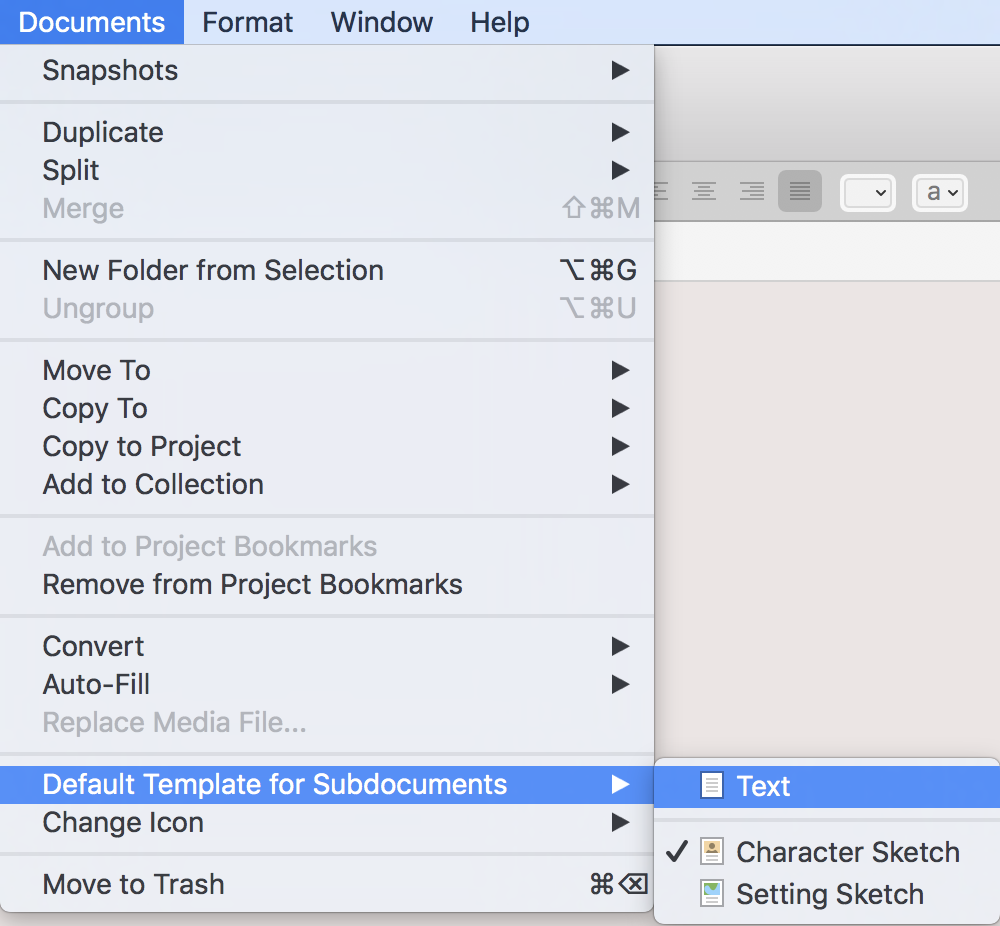 If you now create a new document in this folder, it won’t be an empty text document, like usual, but rather this caracter sheet that you specified as standard subdocument.
If you want to redo that, so that new empty text documents will be created by default, just go to “Documents – Default Template for Subdocuments” again and choose the “Text” option at the top of the submenu.
Copying Templates between Projects
If you want to copy your templates from one document to another, that’s very easy to do and it work exactly the same was as copying any document in the binder from one project to another. Just open both projects side by side and drag the template folder over into the binder of the other project. That’s it.