How To Create „Standard“ And „Automatic“ Collections In Scrivener
Scrivener Collections
As you might know by now, Scrivener is very flexible when it comes to creating and sorting all the various documents that you might have in your project.
But often, you will have several documents that you want to view seperately in a certain order, or you might want to filter your document by certain criteria and only focus on them for a while.
That’s what you can do with collections.
Collections let you put together various documents in a certain order, independently from their “real” order so to speak in the binder.
And, you can also create automatic collections, that always collect documents that have a certain word, a certain, label, or certain other kind of information that you want to use to filter them out.
Standard Collections
Let’s look at standard collections first. “Standard” means that you decide what documents you want to put into the collection and it will always stay the same unless you change it.
To display the collections section in the binder area, go to “View – Show Collections”. Alternatively you can also click the show/hide button in the toolbar up top left and click “Show Collections” there.
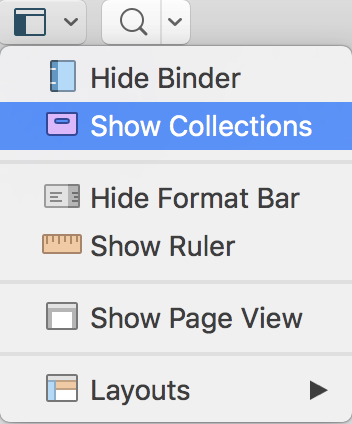 Now you should see a bar at the top above the binder that says “Collections” and on the right side you see these “+” and “-” buttons.
The “-” is greyed out now because we don’t have a collection yet. But if you click “+”, Scrivener will create a new collection and add the document that you have currently selected in the binder.
You can call that collection whatever you want, just give it a useful name so that you will find it quickly later when you have a whole bunch of these collections.
If you want to go back to the binder, just click this “Binder” bar that you see a little bit above your collection.
In order to add files to your collection, you can just pick them from the binder and drag them on the name of your collection.
Or, with the documents you want to add selected in the binder, you can go to “Documents – Add to Collection” and then choose the collection you want to add them to. You can do the same via the right-click menu in the binder.
In the collection itself, you can change the order of the documents by just click-dragging them to any place you like. The order here in the collection does not influence the order of the documents in the binder.
That’s exactly what collections are for. They give you an additional possibility to structure your document without influencing the order that you already have created in the binder.
But be aware, those are still your real documents, it’s not a copy. So, if you change the content of the document here in the collection, this change will also be seen if you access that same document from the binder.
At the top of the collection area, you see this little arched arrow that points to the right. If you click that, Scrivener will open the contents of the whole selection in the active editor.
With the “-” button you can delete documents from the current selection, just select on or more documents that you want to remove from the collection and then click this “-”. This will not put the documents in the trash, they will still be in your binder, it just removes them from the current collection.
If you don’t like the color that Scrivener assigned to the collection automatically, click the little down arrow at the right side of the collection name, and there you have a color chooser to change it.
 Saved Search Collections

Now that we talked about standard collections, let’s look at how we can create automatic collections, or rather “Saved Search Collections”. That’s what they’re called in Scrivener.
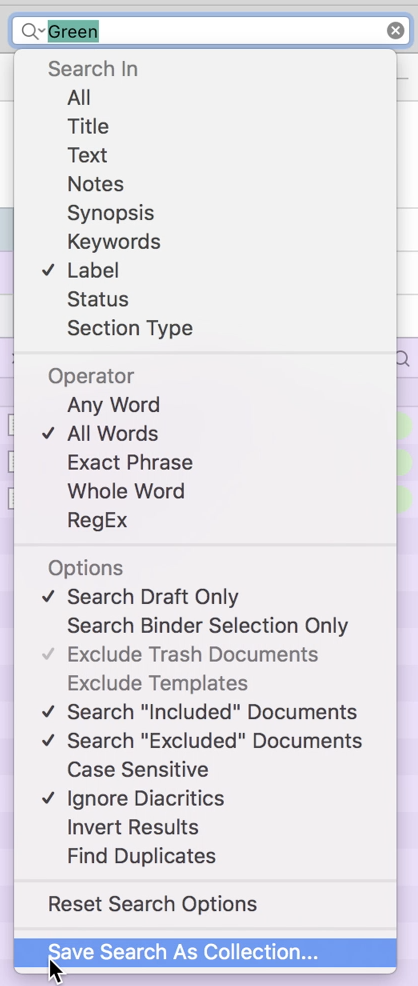
Click the magnifying glass in the toolbar, this opens up the search, and when you click on the little magnifying glass in side the search bar at the left side, you get a whole list of search options.
In the upper areas of that list you define where you want to search, a bit further down, under “Operator” you decide how Scrivener should treat the words that you put in the search bar, and then, even further down, you get some options to refine your search results a little bit, for example you can search inside your draft only, if you know that what you’re looking for is in your draft, and then you don’t get all the other results.
Now, whatever it is what you want to search for here, let’s just say for example, you want to list all your documents that have a certain label, choose that you want to search for label and adjust the other search parameters, and then, when the search result is satisfactory, you go to the bottom of the search options menu, and click “Save Search as Collection”.
 Scrivener will ask you for the name of the collection, and now you have created an automatic collection, that will continuously update, according to what you specified in the search settings.
If we stick to the example of searching for documents with a certain label, if you remove or change the label that we searched for of one of those documents, it will be automatically removed from this saved search collection. And, the same way, if you add that label you searched for to a new document, or any other document, it will be automatically added to this saved search collection.
So, this is a great feature to stay on top of things. You could for example create saved search collections to automatically see the scenes of a certain character, of only see the documents that have a “To Do” status set, or everything else that comes to mind.
If you use custom metadata you can also combine these. You can create custom metadata for your documents and then filter with a saved search collection, that only shows you the documents that have a certain value in that custom metadata field that you set.
You see this is very powerful and I bet once you wrap your head around this, there will be many situations in which this can help you staying organized and on top of things.