Viewing And Handling Multiple Documents (“Scrivenings”) In Scrivener
Multiple Documents In Scrivener
In this article we will take a look at how you can view how to handle multiple documents in Scrivener at once and also how you can split and join documents.
Since Scrivener is a so-called nonlinear writing application that lets you store several documents in one project, we can do some pretty awesome stuff with those documents that can help you structure your writing.
If you take a look at the binder on the left side you see that there are several documents, each of which can hold text.
If you click on one of them, the content will be displayed in the editor where you can see and change the document itself.
But there are situations where you might want to display several of those documents at once, as if they were form one big documents so to speak.
So let’s look at how you can do that.
Selecting several Documents in a Row
If you go to the binder and you hold down the shift key while you select the first document and the last document in a row of documents that you want to have displayed, Scrivener will display all of them in the editor as if they were one long text file.
If you go to the editor and scroll down a bit if necessary, you see a dashed line where one document ends and the next one begins.
Now you don’t need to change back and forth between each of those documents if you want to write or edit several of them at once. You only need to go up or down to go to the other document, which saves you a lot of time.
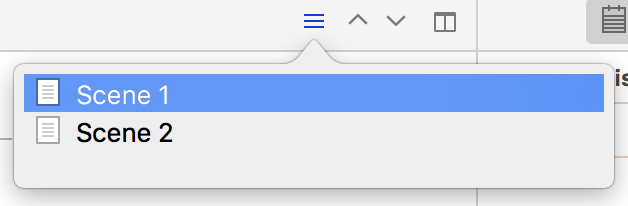
Also, if you take a look at the title bar the editor you see on the right side this hamburger menu appeared. If you click it you see the documents that are now displayed in the editor and you can jump to one of them directly. This is especially useful when you have selected a lot of documents at once.
 You can see the title of the document that you’re in right now in the title bar where it says “multiple selection” and then the title of your current document. If you place your cursor in another one of the documents you have currently selected, the title changes to the title of the document you are in now.
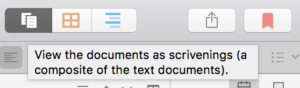
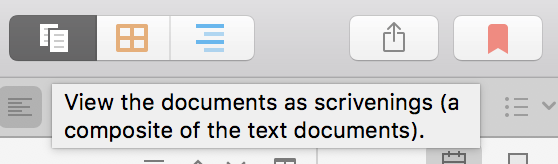
Now take a look at the view modes in the toolbar for the second.
You see that we are in document mode right now, the leftmost of the three view mode buttons is selected. Usually, if you have just one document selected and open in the editor, this document view mode button only shows one page as icon. But now, since we have a selection of multiple documents, you can see that the icon changed to two pages that overlap each other.
 Picking specific Documents
What if you want a couple of your documents displayed in the editor that are not following each other?
You can do that as well, just hold down the CTRL key on the PC, CMD key on the Mac to select the documents you want to see. Scrivener will then only show you the ones you have selected.
Display sub Documents
Another way to display several documents in a row is to click on a parent’s document or folder that holds several sub documents.
Just click on a document or folder that holds sub documents in the binder and one of two things might happen: depending on whether you click on a folder or a document with sub documents, Scrivener might show you the content of the parent folder or document, or all of the sub documents that are beneath that parent folder or document.
In either case, if you click on the document view mode button, you can switch between showing the content of the parent and viewing the children.
Usually, if you click on a folder, Scrivener will show you the children, whereas when you click on a parent document, it will show you the parent document.
Selecting Text over Document Breaks
You can select text over document breaks. If you have several documents at once displayed in your editor you can for example select them all at once and then copy the text to do with it whatever you like.
This only works with copy, though, not with delete. So, you can copy the whole text at once, but you cannot delete it all at once. My guess is that this is a security feature so that you don’t accidentally delete text from documents that you didn’t want to delete.
Alright, now you have a pretty good overview of how to work with several documents at once in the editor, and also how to split them, merge them, and access each one of them easily.