How To Use Section Layouts In Scrivener’s Compiler
Scrivener Compiler: Section Layouts
In this article we will look at what Section Layouts are in Scrivener’s compiler and how you can set them up.
To demonstrate what Section Layouts are and how they work, I use Scrivener’s built-in novel template as a starting point, but you can follow along with every other template or project of your choice.
The names and definitions in the compiler might be a bit different in that case, but the working principle is always the same.
To get to the section layouts, open the compiler by going to “File – Compile”, and then in the left part of the compiler window go to the settings of one of your compile formats. I’m using a duplicated copy of the “Manuscript (Times)” format here.
In order to set up these compile formats, the compile format designer window opens up and on the left side you see all these topics of what kinds of settings you can change here in the designer.
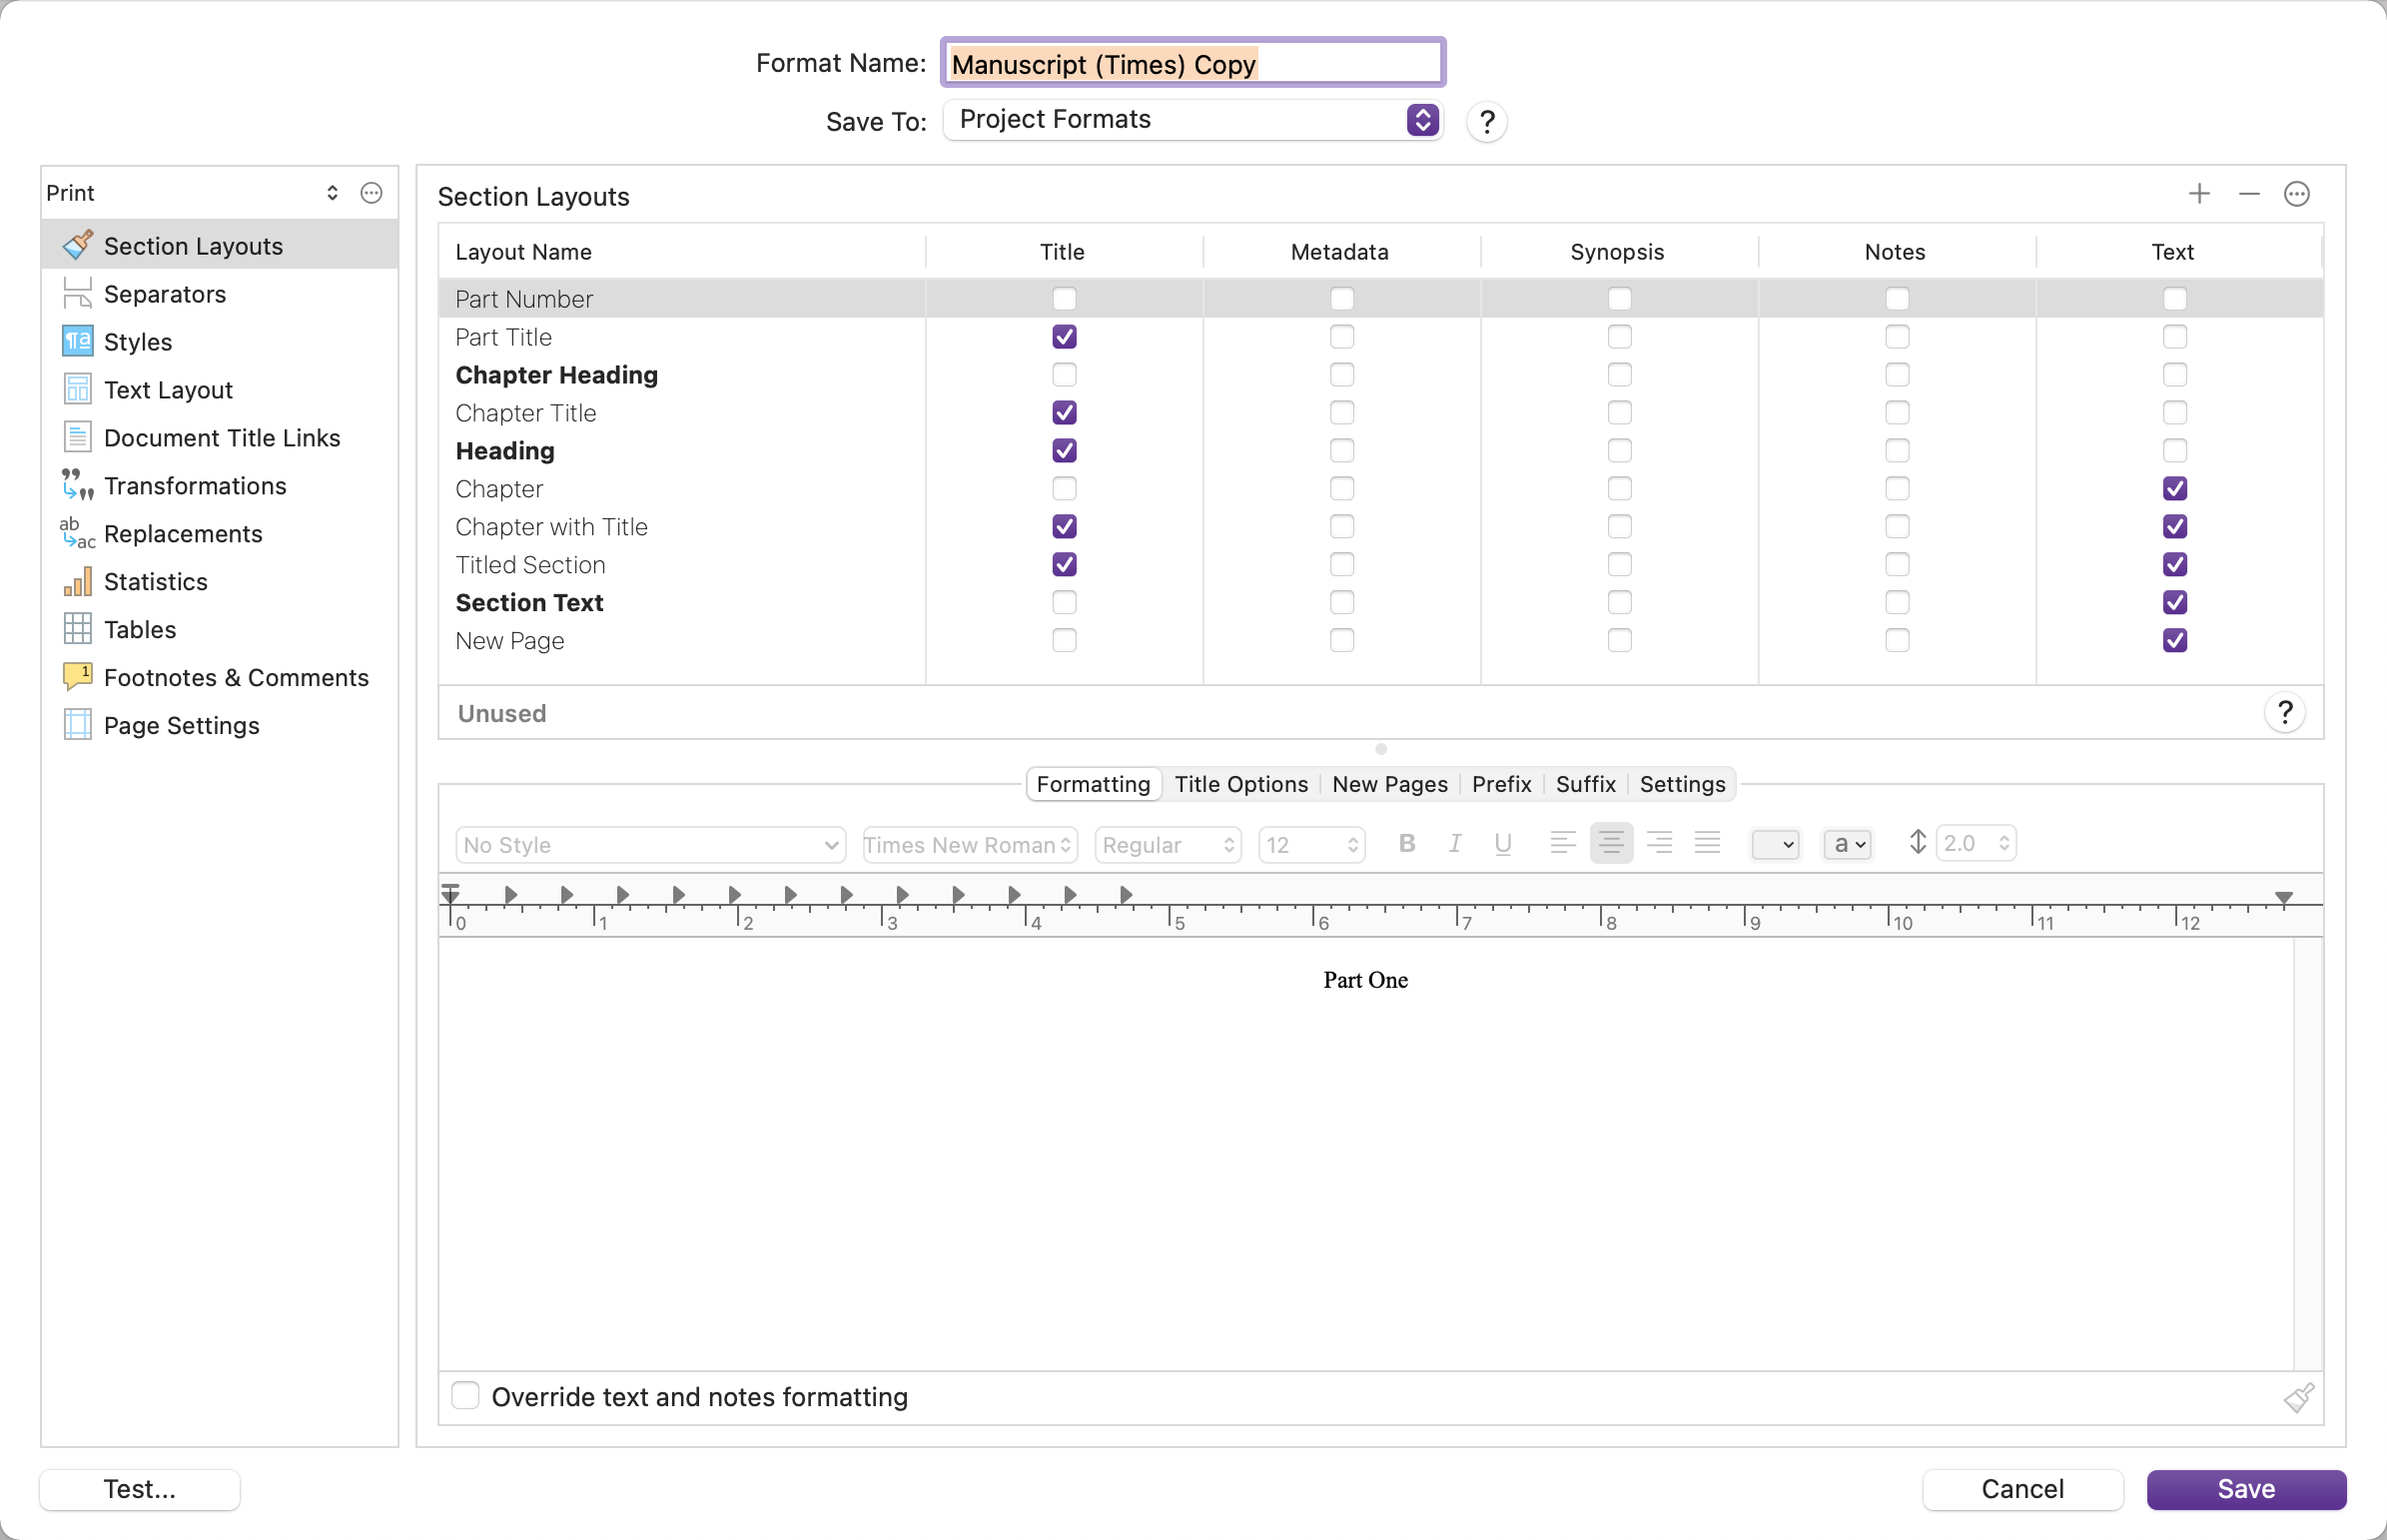 The first topic is section layouts, and these are what we are going to take a look at in this video.
If you take a look at the names of these section layouts, you see that they define how different elements of your draft or manuscript will look like.
Or, in other words, in another part of the compiler, later, we will define which of the documents in your project, will be comiled according to which of these section layouts.
You could say that every document in your compile is a section, and here you create all these different section layouts to tell the compiler, which of your documents do you want to have compiled with which content, and which formatting.
Basically what you do is, you think, okay, I have all these different documents in my project. And they all have different types of conent, probably.
They can hold a title, metadata, a synopsis, notes, and text.
And here in these section layouts you define, which of these do you want the compiler to handle.
An example:
You see the “Heading” section layout here. And you see that for this “Heading” section layout, only the title is checked. All the other checkboxes are unchecked. So, whichever document in your project we apply that “Heading” section layout to, only the title of that document will be included in the compile, but not the rest.
No matter what you have in that document in terms of metadata, synopsis, notes, or text, all that will not be compiled, just the title. Because this is the only element that you checked.
And just as a side commentary, don’t worry about how we will apply these section layouts to the documents in your project right now, we will do this in another step. Right now let’s just focus on understanding what these section layouts do.
Another example:
If you look at the “Section Text” layout, you see that only the “Text” checkbox is marked, the other ones are empty. So, if we apply this “Section Text” layout to one of our documents in the project, only the text will be compiled, and all the other elements, like title, metadata, and so on, will not be included.
That is the basic working principle of section layouts.
You define what different kinds of layouts you need for the documents that you have in your project.
And the names that you give them are arbitrary. In my opinion, it helps to name them – like they did here – with what it is that they will compile, so that later, when you assign these section layouts to the documents in your project, you will know from the name what they do.
Okay, I think now that you have grasped the concept of how these section layouts work, let’s look at some of their options.
In case you’re still scratching your head a little, don’t worry. Once we will have gone through all the necessary parts of the compiler you will see how they all hang together, and then it will be way easier to understand.
So, just take the steps with me, event though you still might be a little confused. That’s okay.
Manage Section Layouts
Let’s look at how to manage section layouts now.
You see these “plus” and “minus” button in the top right corner? To delete existing section layouts, you just select the one that you want to delete, and then click “minus”, and to add new ones you just click the “plus” button.
Let’s create a new one for the sake of demonstration.
I’m going to call it “Title Synopsis Text” because I want to include kind of a summary of each of my chapters before it compiles the text.
So, I just check these: title and synopsis, and text.
And you see in the field below that we now get kind of a preview of that that’s going to look like.
I won’t go through all the settings here for the section layouts because I want to keep this simple for now. Once you grasp the concept, you can always play around with these, but for now I’m just giving you the broad strokes.
Okay, so in the lower part of the window you see the elements that will be included in the compile.
And if I click inside of one of them, you see that these formatting tools at the top of the lower window activate. Now I can define what formatting I want to have in the compile for that element.
I can change the formatting for my title, for the synopsis, and also for these headings that have been added, where it says, “Synopsis” and “Text”.
You also see that the text part is greyed out and I can’t change the formatting. So, right now it would compile with the formatting settings that I use in the editor.
If I want to change the formatting of the text also, I need to check this box at the bottom that says, “Override text and notes formatting”. Then I can also change the formatting of my main body text.
So, you see that the way you store and format your information your Scrivener project doesn’t necessarily have something to do with how it is compiled.
You can have all kinds of informatin in your documents in all these different places, like synopsis, notes, etc., but when it comes to compile, you just decide which ones you want to use for which ones of the documents.
One more thing: you see that right now some of the section layout names are in bold, and others are not. The bold ones are the ones that are used in the compile, the way this compile format is set up right now. All the other ones are not in use. So, if you were to change any of the not bolded ones, nothing would change in your compile.
Alright, real quick, let’s look over the rest of the settings in the lower part. Again, this is just an overview to see what you can do there. Going through all these settings in detail is way beyond the scope of this video, and I want to keep this as short and basic as possble.
In the second tab in the lower window you have title options, including title prefixes and suffixes. You could for example add something that always comes before or after your title.
This could be automatic numbering, or other things.
In the next tab you can define how new pages are handled.
Then, you have a prefix and suffix definition for the whole section, so whatever you put here will be added before or after the section, or document for that matter.
And, in the last tab you have a couple of more options about how to deal with first line indents.
Okay, so, I hope this has given you a better idea about how you can style the different parts of your project, and very soon, we will be bringing it all together, and then you will see how all these different parts of the compiler work together to give you the exact output that you want to have.