How To Use Section Types For Compiling In Scrivener
Scrivener Section Types
In this article we are going to take a look at section types in Scrivener.
If you’ve ever taken a closer look at the compiler you might have come across these already, if not, no problem, we’ll start right at the beginning so that you understand what they are and why they are important for how you use your Scrivener project efficiently.
Sometimes, at first, the topic of section types can be a little dry and abstract, so what we will do is we’ll take a ready-made example from the built-in Scrivener project templates and look at how section types are used there, and in the midst of that I’ll also show you how to change them and set them up yourself.
Alright, I’m using the novel template for this demonstration, but the concept of section types is the same in every Scrivener project. It’s just that their names might differ and their hierarchy might be set up differently in other project templates because they need to compile differently.
Set up Section Types
In order to set up section types, go to the project settings under “Project – Project Settings”.

 In the window that opens up you have all the main project settings, an in the first section up top, the one that opens up by default we have our section types settings.
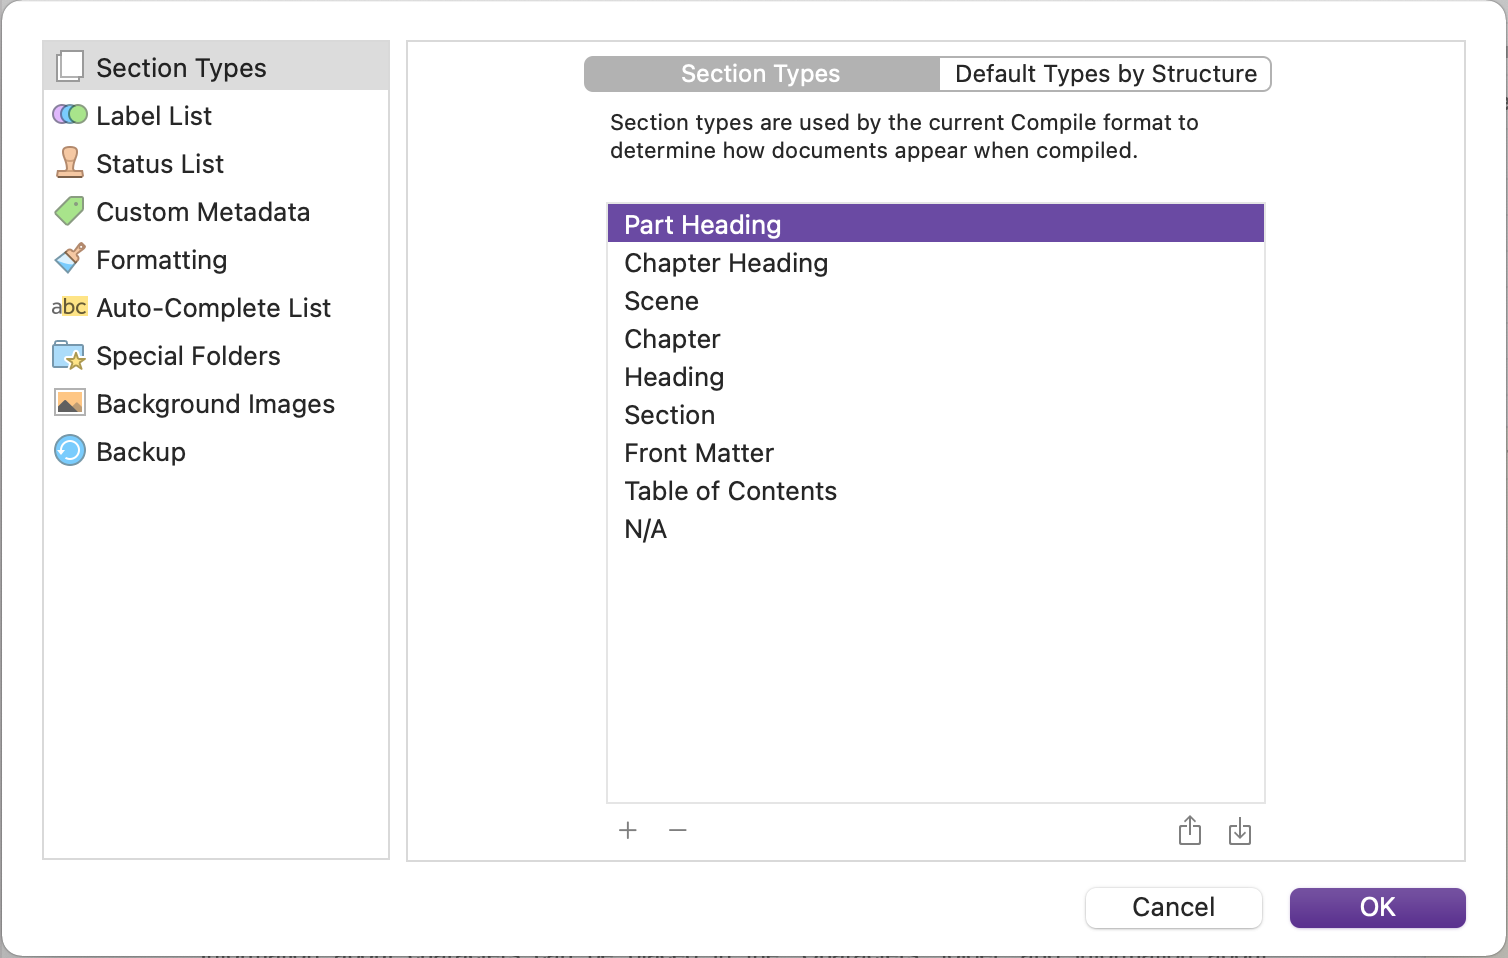
Now, to understand what they do let’s just take a look at what types of section types we have here. And we can guess from the names that they have here that they might have something to do with the different kinds of documents that we have in our project.
And that’s basically what they are. These section types arenames settings that define, what types of different formatting settings I will need to set up in the compiler.
If we think about it for a second, it makes sense that, for example, a title page needs a different kind of formatting than for example a chapter header, or a scene.
So, these section types are not the formatting settings themselves, they are just the names that I can apply to a certain document so to speak, so that the compiler knows which formatting settings, or rather, which compile settings to use for that document.
To understand better how section types are linked with the compiler, let’s leave this window for a second and go to the compiler window.
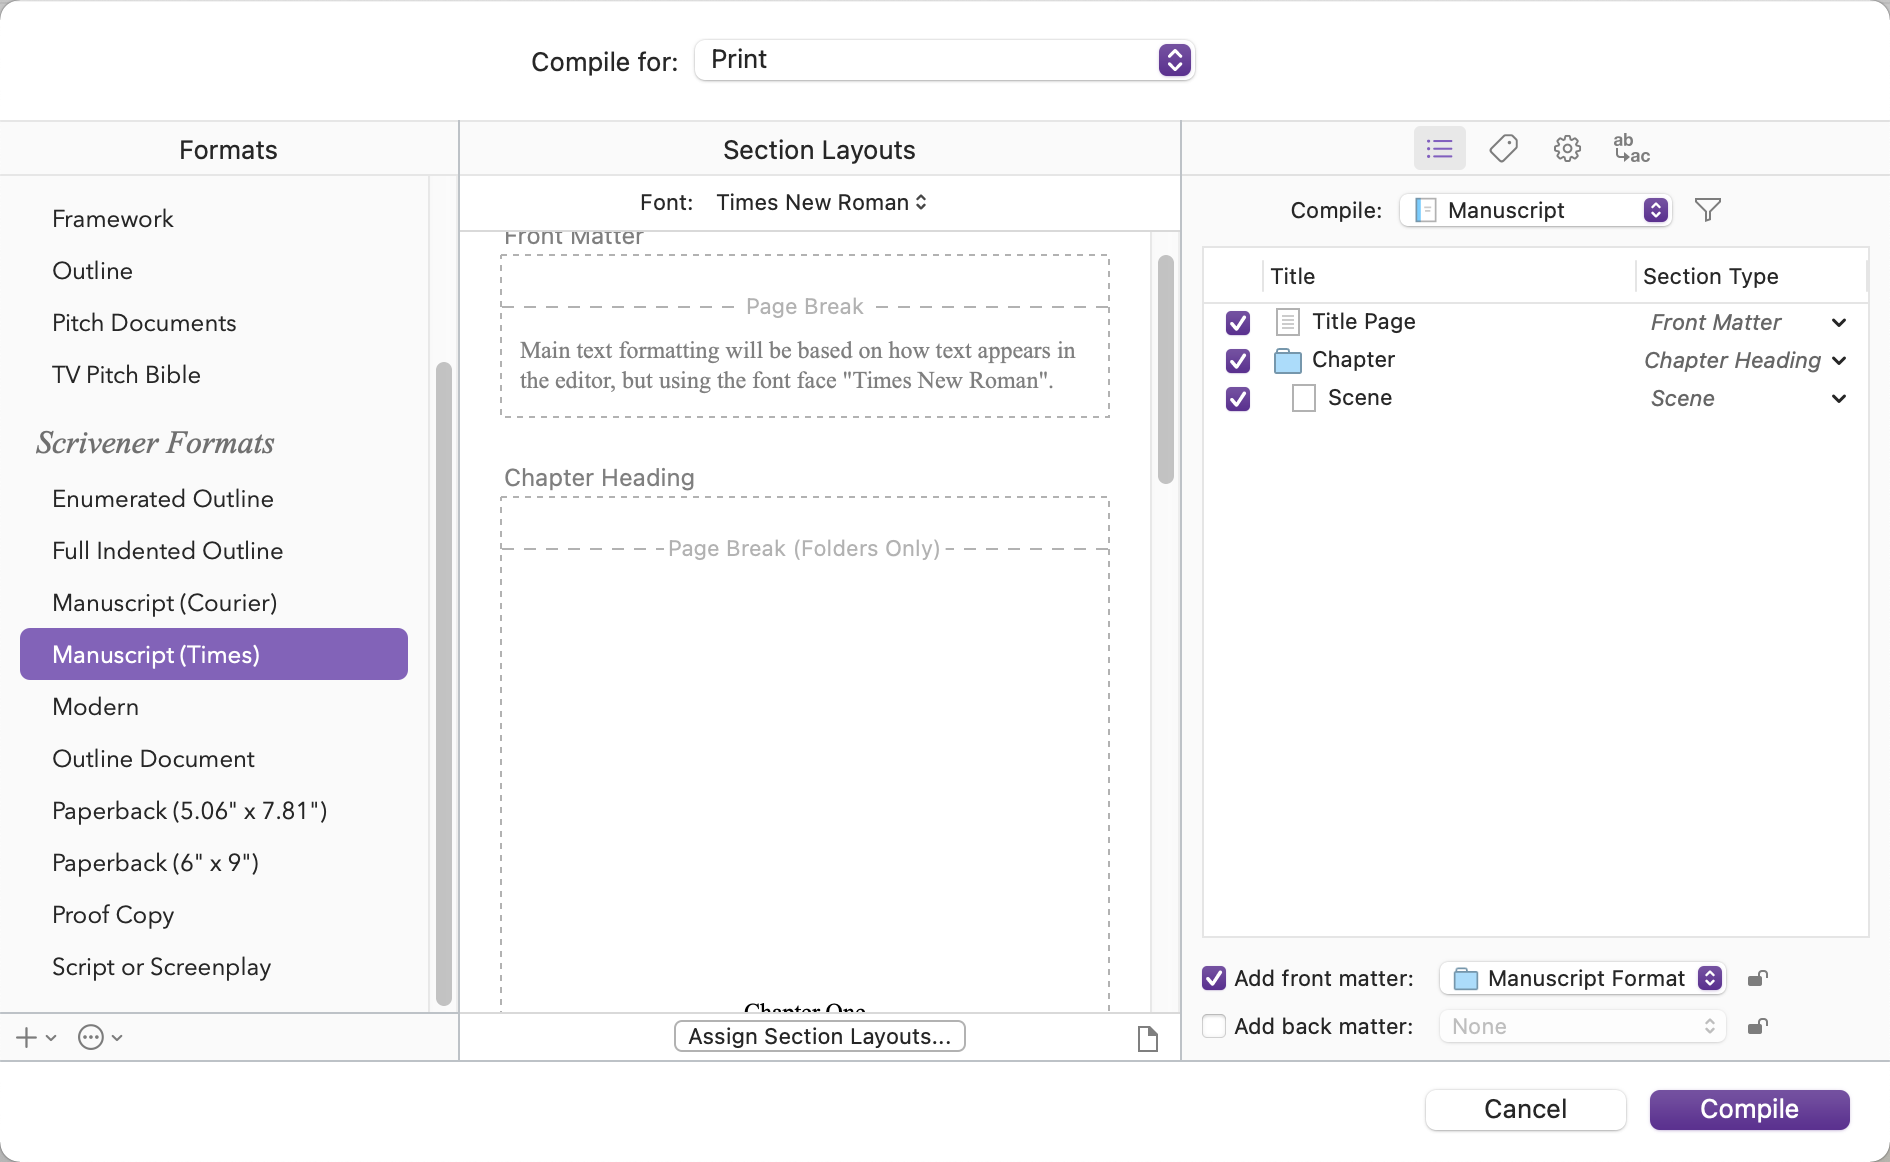 If you go to “File – Compile” to open the compiler window you see that at the right side of the window you have the area where you can define which documents will be included in the compile. You can check and uncheck them to include them or exclude them.
And not only that, at the right side of each document you see that it shows us the section type of that specific document.
So, that means, the way the compiler is set up now, in my case, the title page has the section type “Front Matter” applied, the Chapter has the section type “Chapter Heading”, and the Scene has the section type “Scene”.
You also see that these section type names are now written in italic.
That means that right now these documents have applied their default section types.
But, that doesn’t mean that we can’t change them. If we want to apply another section type to one of those documents, we just click the section type name, and a drop down menu pops up that let’s you choose a different section types.
And you see that the names in this drop down are exactly the names that we just saw in the project settings window earlier.
If we now choose a different section type manually we see that the section type name is no longer displayed in italics, so that we can see instantly, if we take a look at that part of the compiler window, which files have their default section applied and which ones have been changed manually.
If right now you’re scratching your head a little and you’re thinking, “okay, right, but how do I set up the formatting of these sections”, we will have a look at that in another article. I understand that right now this setting up the section types is a little theoretical but once we’ve gone through the whole compiling process, including defining the formatting for these section types, it will make more sense to you.
Creating Section Types
Alright, there is one more thing we need to take a look at in regard to section types.
We already know how to change them if we want to change them, but we also need to know how to create our own section types and how to set up our own defaults, right?
Let’s look at creating section types first.
For this, let’s go back to the project settings window.
In the project settings under “Section Types” that we just saw earlier, we have the list of our current section types in this project.
To add new section types you just click the “plus” button at the bottom of this window and type in a name. That’s it.
You’ve created a new section type.
It’s that easy. With the “minus” button you can delete section types, but be aware that if you delete section types that are used in this template you might mess up your formatting. So, before you delete section types, make sure you really don’t need them anymore.
Also, at the bottom right you see two buttons for exporting and importing. If you use the same – or a very similar – section types structure in several projects you don’ have to create them all from scratch every time you can just export them in one project, and import that file that you crated into the other project.
Defining default Section Types
OK, now we know how to create and delete section types, and how to select which document should use which section type in the compiler window.
Now the only thing that’s missing is defining which section types should be used as default for which document.
Because imagine, if you have lots and lots of documents in your project that you include in your compile, and the section type defaults are not set up correctly, that would be a lot of manual work to change them all.
And we want to avoid that.
For this, we want to make sure that as many documents as possible in our project, automatically get the correct section type assigned.
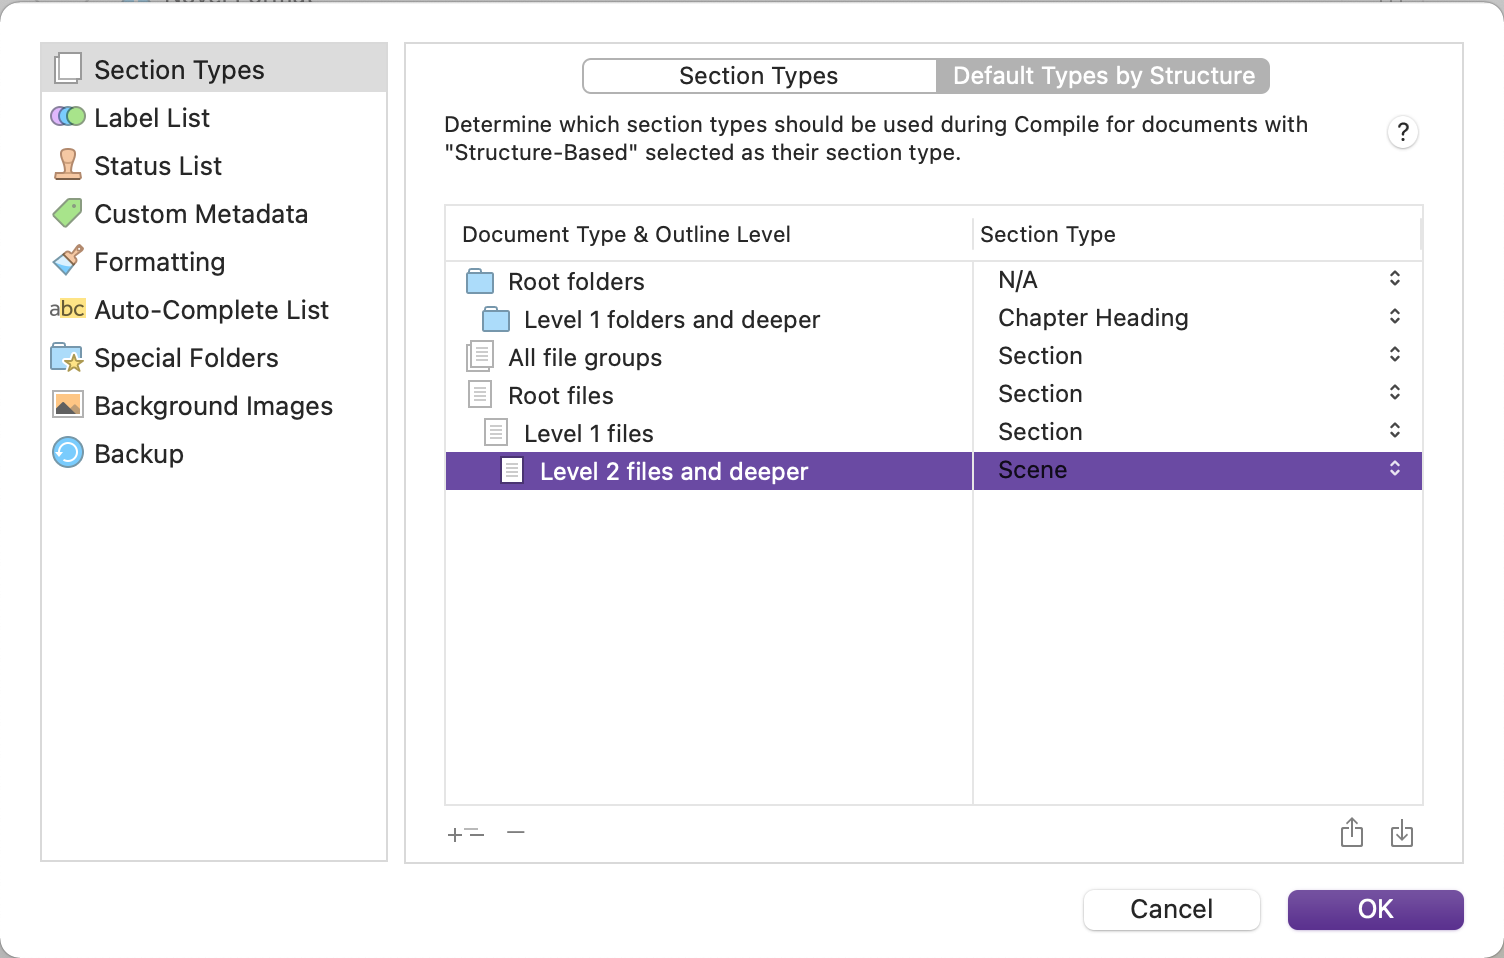
Here in the project settings under “Section Types” we have a second, tabbed window that says “Default Types by Structure”.
If we click that, the window changes to a hierarchical view where we can see different levels of differnt kinds of documents in our project.
Now, this might look a little confusing at first, but let me just explain to you how this works, and then I’m sure it will be much clearer to you.
What we have here basically is three types of documents. We have folders, you can see them at the top, and then underneath we have documents that have subdocuments, you can see that the next icon after the folder icons is an icon with two pages that overlap each other, that stands for documents that hold subdocuments.
And then, below those we have documents without subdocuments. You see that the documents at the bottom only have one page as an icon to indicate that those are documents without subdocuments.
Okay, so we have three document types: folders, documents with subdocuments, and documents without subdocuments.
Alright, so far so good.
Then, next, you already know that in the binder, we can have a hierarchy of folders and documents, that means folders and documents can have many subfolders or subdocuments. And that creates hierarchy levels.
For example, if we create a folder in the draft folder, which is called “Manuscript” in this project template, that folder will be one hierarchy level below the manuscript. In my example, this would be the “Chapter” folder. The “Chapter” folder is one hierarchy level below the manuscript.
Then, in the “Chapter” folder we have the “Scene” document, that means this “Scene” document is also one hierarchy level below the “Chapter” folder. And, it is two hierarchy levels below the manuscript folder.
Because on the most upper level we have the manuscript folder, on the next level below that we have the “Chapter” folder, and another level below that we have the “Scene” document.
Okay?
And in Scrivener these levels get numbers, except the upmost one. All the folders at the top, like the manuscript folder, the template folder, the research folder, and so on are at the so-called “root” level. This is the top level, the highest level. All other folders and documents that you create are either also at this “root” level or one or more levels below.
And all the levels below the “root” level get numbers, starting from 1. So, the highest level is the root level, and then one level below, the “Chapter” folder for example, has level 1, because it is one level below the root level, and then the next level is called level 2, which is the “Scene” document for example, because it is two levels below the root level.
And in this window here, what we basically do is, we define, which levels get which section type assigned automatically. For folders, for documents with subdocuments, and for documents without subdocuments.
I suppose that the thinking behind that is that you are most probably using a certain structure for your project, in which the same types of documents will be more or less on the same hierarchy level, or at least most of the time.
So, what you do to create your default section types is, you see these different levels here for folders, documents with subdocuments and documents without subdocuments. And you see that if you click on one of those levels, in the background that type of documents on that level will be highlighted.
For example, when I click on “Root Folders”, the top level folders in my binder will be highlighted. Or, when I click on “Level 2 Files”, the “Scene” document will be highlighted because that “Scene” document is on level 2, which is two levels below the root level.
If I click on “Level 1” files, nothing is highlighted because right now we don’t have a level 1 file in the binder, or at least none that we could see.
So, in any case the level numbering for all levels is the same, no matter how many of those document types you have on which level. If you have no files on the root level, and no files on level 1, and only one file on level 2, like we have here, the level number is still number 2, even if that’s the “first” level – so to speak – on which a file “appears”. But the number of files doesn’t matter, the level number is always the same, for all the folders, groups (that is documents with subdocuments) and files without subdocuments.
Alright, so use the highlighting so see which level you are on and which documents are going to be affected by the changes you make here to the section types.
At the bottom you have “plus” and “minus” buttons to add and delete levels for folders, groups and files.
If you have, for example 3 levels of groups in your binder, in this case let’s just suppose we had that, and you have only one level of groups defined here in the section type hierarchy, all the groups below will get the same settings.
So, if you define a section type for the root folder in the hierarchy here, and you have two sub levels, the settings of the root folder applies to all the levels below.
And that’s always the case with the lowest level. If you have defined section types for files down to level 2, like we have here, and I were to create files on level three in the binder, the level 3 files would use the same settings as the level 2 files because here in the hierarchy the definition only goes to level 2. Everything below that level uses the same settings.
If I wanted to avoid that and I wanted to give level 3 different setting, I would have to add a level 3 here for the files and then I could define a different section type.
One last thing. If we go back to the compiler window for a second, and take a look at the drop-down menu where you can change the section types, you see that it says “Structure-Based” for this document level and for the next subdocument level.
That is because of the settings we just looked at. If you choose “Structure-Based” that means that the compiler uses the default settings we just saw in the project settings window.
And if that type of document has a hierarchy setting defined for one level below, you also see the selection for the next level down, that means, if for example you had a group or a folder with a lot of subdocuments and you want to change the section type for all the subdocuments, you could just select the default subdocument section type in the folder, and that way you wouldn’t have to go through all the subdocuments and change them manually.
(Pic sub hierarchy)
Alright, we’ve covered a lot in this article, it’s become a little longer than usualy, but section types are a really important concept if you want to use the compiler efficiently.
If right now you couldn’t wrap your head around section types completely, don’t worry, once you will have gone through the rest of the steps to set up the compiler and you’re ready to try different format settings you can go through the whole compiling cycle again and then, applying this with your own project you will see the differences in the result and it will become much clearer to you.
Just keep going and taking the steps, and you will master Scrivener’s compiler to set it up to do exactly what you want it to do.