General Preferences In Highland
Highland General Preferences
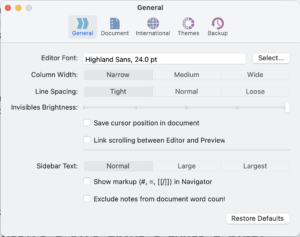
Let’s have a look at the general preferences in Highland.
Because if you’re using the program on a regular basis, there are some things that you might want to adjust to your liking to make the writing experience as good and as pleasant as possible for you.
As in every Mac app, to get to the preferences, go to the name of the program in the upper left, and then click “Preferences”.
Highland opens up the last tab you used here in the preferences, so in case you don’t see the general preferences, just click on the left most tab.
Here you find some general things that you can set up for the editor.
 Setting Font

You can set the font, there’s not much explanation needed, you just click “Select Font” and then you choose the font and the size you want to use in the editor.
Remember that these settings are only for the editor view. For exporting, Highland uses its style templates, so whatever you choose here, won’t affect the final output of your document, just what you see in the editor.
Column Width and Line Spacing
The same goes for column width and line spacing. You have three settings here that you can use for each of them, and again, this is an editor setting, not an output setting.
The line spacing and the column width of your output document is dependent on the export template that you use, not the settings here.
Invisible Brightness
You can set the brightness of the invisibles, which I personally find very nice, because sometimes you need to see invisibles, but they also can look very distracting, so it’s a nice thought to include a setting where you can dim them a bit.
Save Cursor Position in Document
Then, you can check to save the cursor position in your document so that when you open it up the next time, you can directly continue where you left off. At least that’s what it should do. On my system it didn’t work the way I understand it. What it does on my system is, it opens up the page where I left off the last time, but the cursor still is at the beginning of the document, wheter I have this setting checked or not.
Just try it out, maybe when you’re watching this it works perfectly fine on your system.
Link Scrolling between Editor and Preview
Next, you can check if you want scrolling in the editor and the preview to be linked. If this is activated, and you scroll down in your document in the editor, and then go to the page preview, the page preview will show you the same page that you saw in the editor.
If this is unchecked, the page preview will show you the beginning of the document, no matter on which page you were in the editor.
And when you scroll down in the page preview, it won’t have an effect when you go back to the editor, you will see the page you saw when you changed to the preview.
Sidebar Text Size
Then, you have a setting to adjust the text size in the sidebar. Depending on the screen resolution you like to use, this might be very handy. Just pick one of the three possible sizes that works for you.
Show Markup in Navigator
Next, you can check whether you want the markup syntax to be shown in the navigator. If you check that, you will also see these hashes, brackets, and what not for the different elements in the navigator. If you uncheck it, you will only see them in the editor, but not in the navigator.
Exclude Notes form Word count
Then, you can check to exclude your notes from the word count of your document, so that it really only counts the words in your document and you get a real sense of how much it’s going to be and the count is not distorted by the amount of notes you have.
Restore Defaults
And, finally, there is a button to restore the default settings in case you need to.